Krita - Seamless Texture Creation
Krita is a professional free and open source painting program. See the Krita page for general information.
Seamless Texture Creation with Krita[edit]
by João Queiroz e Lima
Introduction[edit]
In this tutorial we are going to turn a photo that we found online, into a seamless texture that we can use as Base Color for a PBR material.
PBR stands for Photorealistic Based Rendering, it’s been standard for Architecture Visualization for a long time, but it is now being widely adopted by other industries relying in computer graphics. You can read a nicely detailed description about this material creation workflow here:
https://academy.substance3d.com/courses/the-pbr-guide-part-1
The photo we will base our material was taken by Pete Willis and is freely available on Unsplash. You can find a bunch more excellent examples there, either taken by him or by other Unsplash artists/curators.
The tutorial will be based in Krita 4.4.1 for Windows but it should be able to be followed in other platforms as Krita is platform agnostic.
Opening File + Activate Wrap Around Mode[edit]
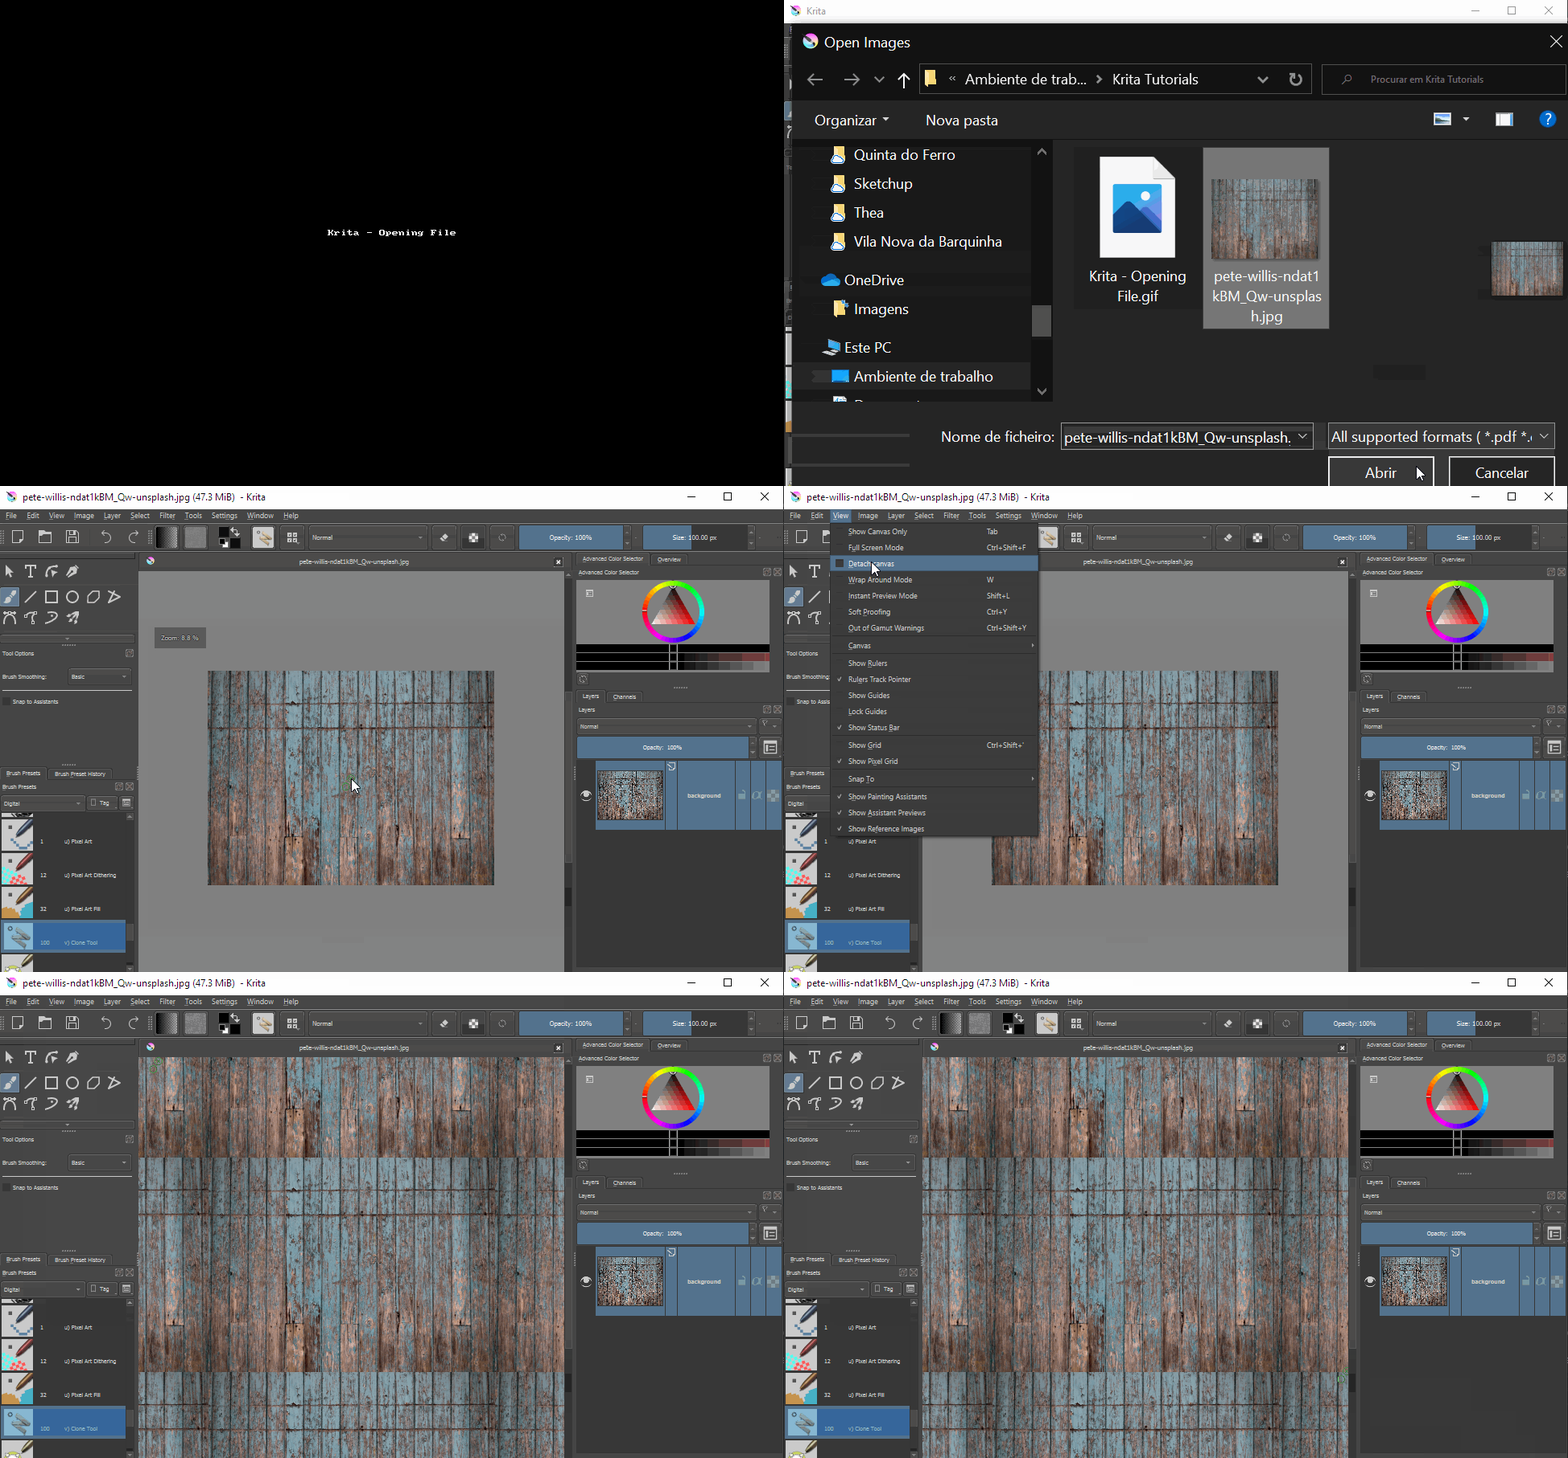
As you open Krita a welcome scree will allow you to open or drag and drop a file, as well as giving you access to your recent files. Alternatively you can close this window and use File > Open or File > New and Layer > Import. You can also setup Krita to automatically open your files.
After opening the file you can see how it works as a seamless material by activating Wrap Around Mode.
Setting Up a Shortcut for Wrap Around Mode[edit]
As we are going to use this mode several times in this tutorial it’s convenient to set up a shortcut for it. I’ll use W:
- Go to Settings > Configure Krita
- Find the Shortcuts panel icon on your left
- On the top search box start typing Wrap and the search filter should be fast to show the Wrap Around Mode command
- Click it and click the box button next to Custom:
- Hit W key.
- Press the OK button in the bottom of the Settings Panel
Now on Krita you can hit W to toggle Wrap Around Mode.
Preparing Image Geometry – Vertical and Horizontal Guides[edit]
Most times texture pictures are taken slightly tilted or with a slight perspective. If the materials being pictured are random, or don’t have clear geometry this might be negligible, however, most human made materials seams, joints or other geometric elements that form patterns, will require extra atention.
To create seamless textures from images with geometric patterns the first step is to make the geometry in each edge of the image match the opposite edge. This is what will make it continuous in the two directions Vertical (V) and horizontal (U). This will then allow the geometric pattern to be repeated along the UV mapping of your geometry.
The process will envolve Krita’s transformation tools and cropping the image so it’s basic geometry aligns in horizontal and vertical directions.
Our example picture features vertical lines for wood planks, we just need to be concerned that the geometry matches vertically as we will be able to take care of other minor horizontal features later. Our objective, in this case, will be to align wood joints vertically so we should start by creating two guides at the extremes of the image, were deformation is bigger.
For more complex geometrical patterns the tiling might have to be performed both horizontally and vertically but the principles we will use for vertical tiling will be the same for horizontal.
To help us align the images vertically or horizontally Krita allows us to use Guide Lines but for them to be shown, created and edited we have to activate some settings:
- Go to View menu and activate View > Show Rulers and View > Show Guides
- On Settings menu activate Settings > Dockers > Grid and Guides
- A New Docker will appear on your docked panels, even if it’s tabbed in an already existing panel.
- In this docker you can configure Krita’s Grid and Guides. You have a tab for each. Click the Guides tab.
- On this Guides tab choose a stronger color for your guides, that contrasts with the image you’re working with. Click the button at the right of the Guides: Lines which displays a color that might be dark grey on the first run.
- You can also change the Guide’s linetype by hitting the Lines button.
- Rulers will now also be visible on top and left of the canvas. If they’re not, you can also make them visible from the Guides Docker.
- To Create a Guide you must click and drag your mouse on a ruler and move it to the top of your canvas.
- If Wrap Around Mode is active it might be hard to drag your ruler to the right spot. Hit W to deactivate it and drag again.
Perspective Transformation[edit]
The transformation we usually need is to correct perspective. Krita features a single tool for transformation actions and this tool has a subset of tools. The default is the scale tool but you should investigate other transformations as they are very powerful and might be helpful in future scenarios:
Using the guide lines for reference we will now perform the Perspective Transformation:
- Click the Transformation tool,
- Select Perspective Transformation tool (second icon),
- The first thing you’ll notice when trying to transform the Layer is that as soon as you start deforming it, guidelines will be hidden. (This seems like it should change and I just asked on the Krita forum to change it.)
- Slide down the Background Layer’s Opacity Slider like in the animation below to around 50%
- After that you can keep transforming the layer by using the Corner Grip Points on the perspective transformation tool.
- Keep zooming in and out and panning around so you have more control and also to avoid any Krita snapping that might be active. You might deactivate snapping on the Grid and Guides Docker.
- Shift the image until the joints align with the corresponding guide lines.
- Hit Enter/Return key on your keyboard when you’re finished.
NOTE: On more severe transformations finishing one side after having done the first side will probably deform the first. You should check both sides before hitting ENTER to comit the transformation.
Cropping[edit]
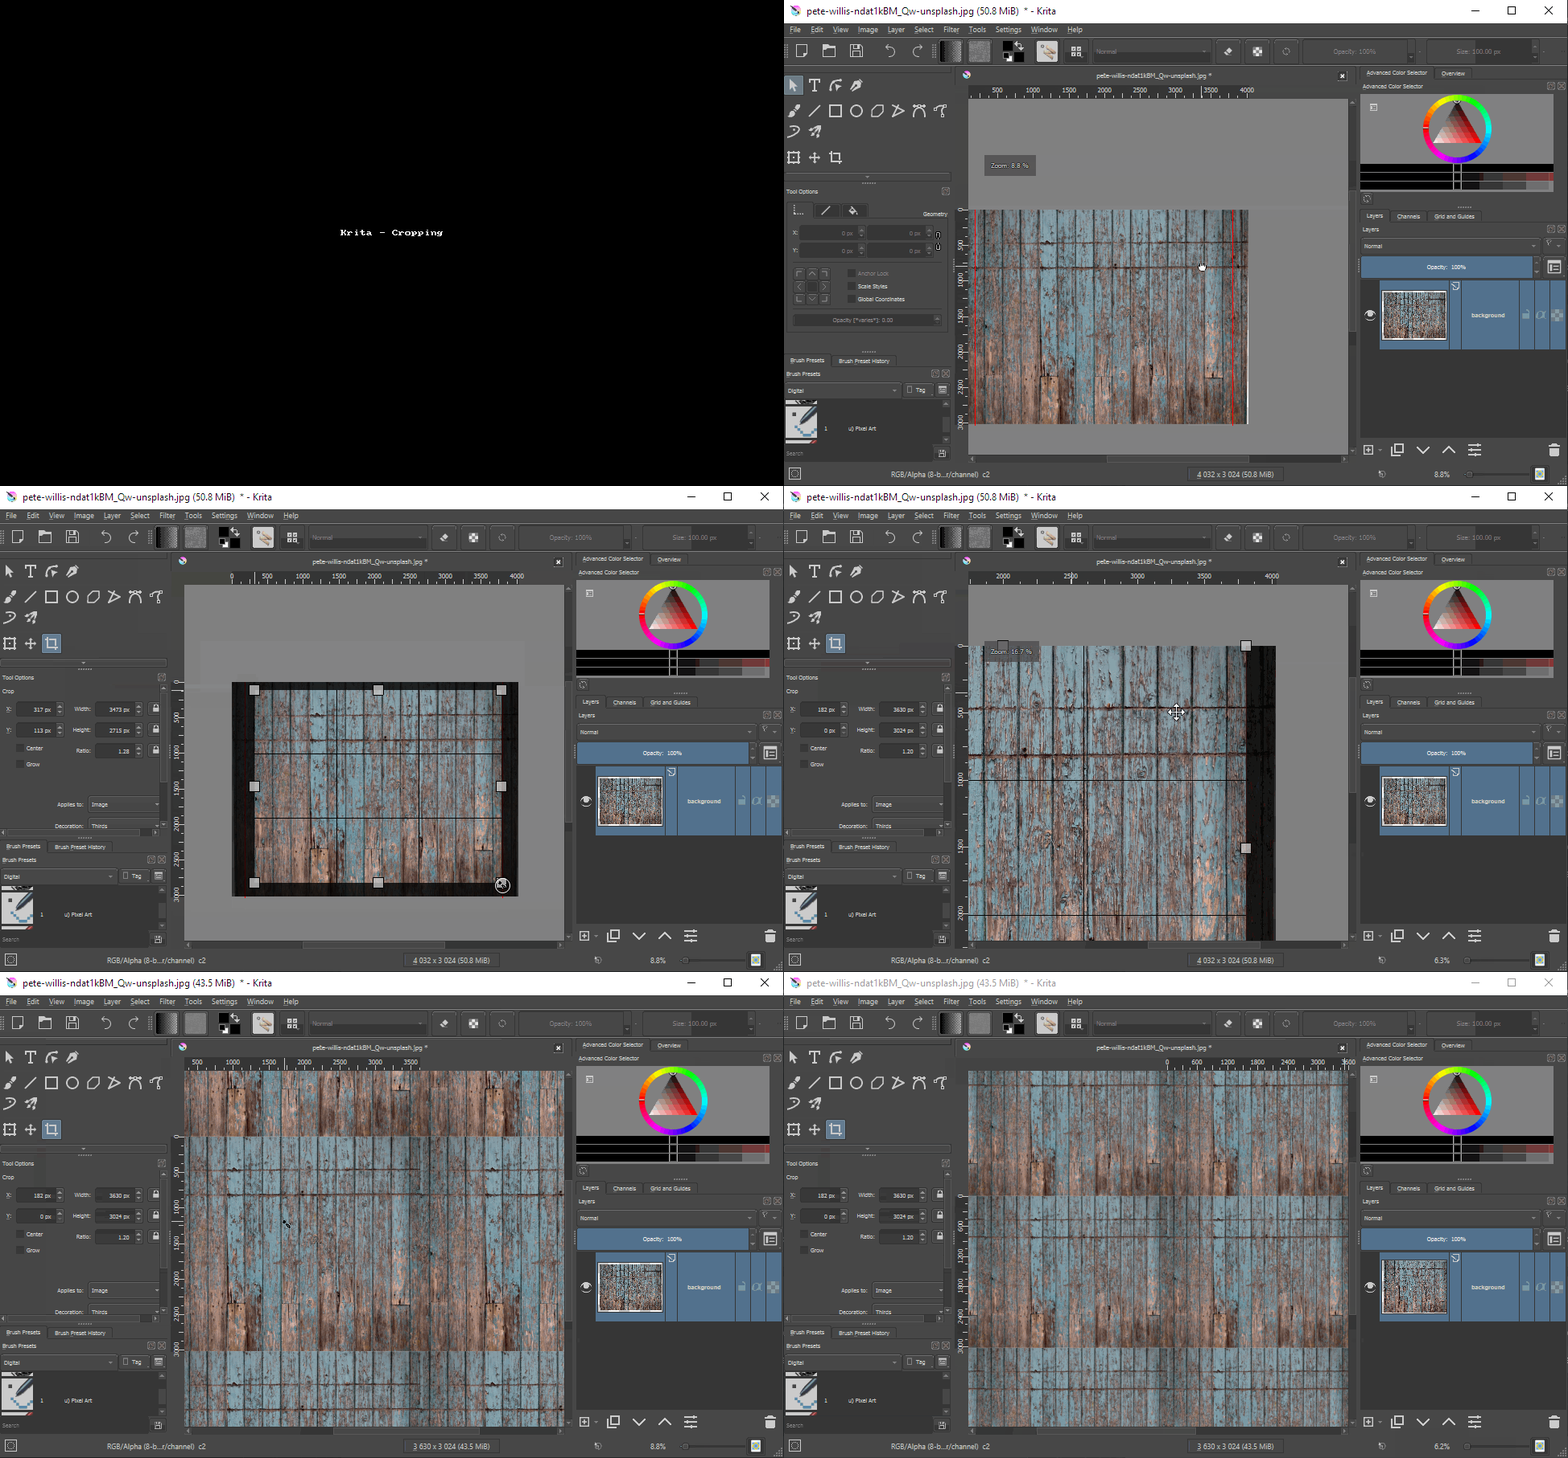
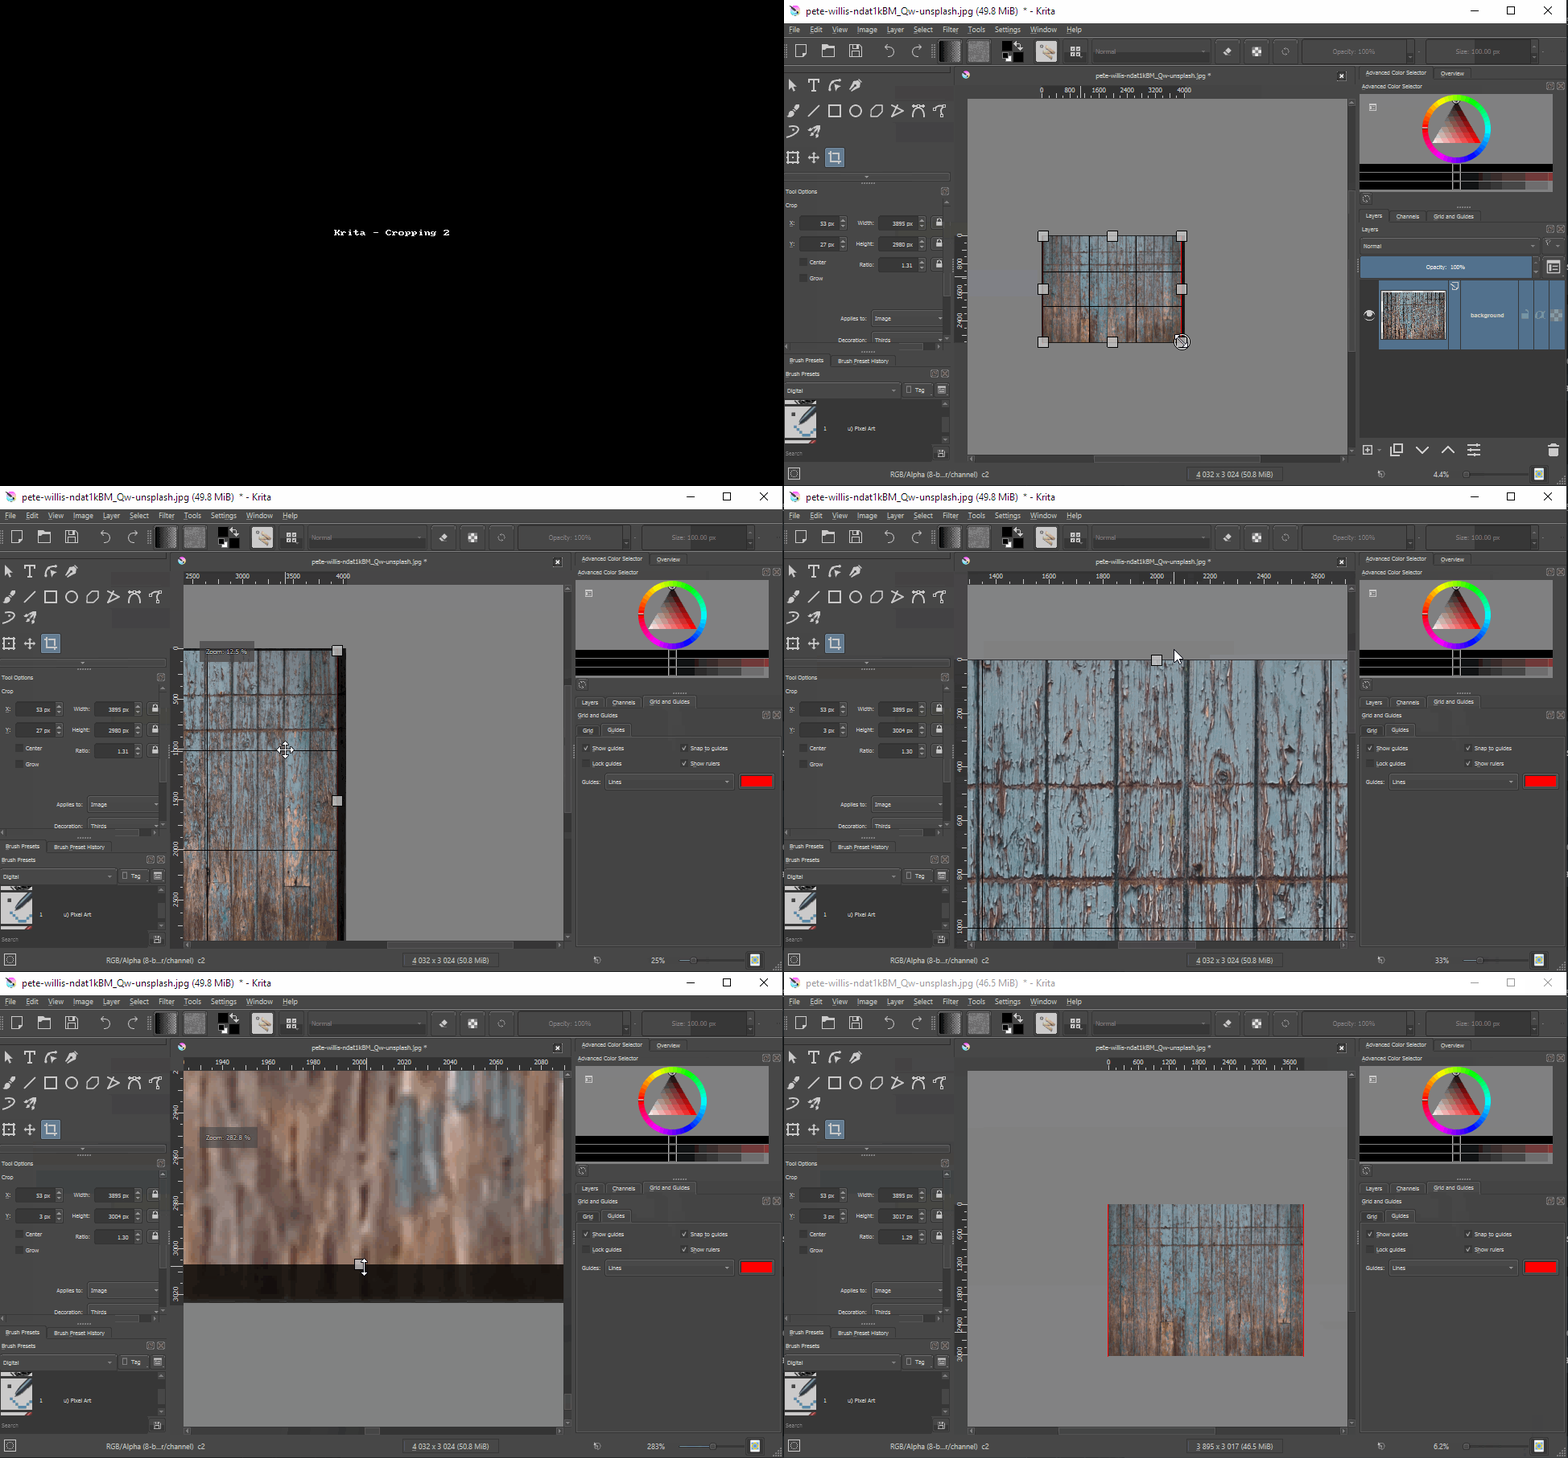
You should now crop the image so the point it starts will be matching the point it ends. You can either crop at a joint line, if those lines are matching in appearance or you can crop at the middle of a plank if the joints are very irregular or colored differently.
In this example both methods will work so I’ll exemplify both.
The overall process for cropping is to:
- Activate the Crop tool.
- Click on the first corner of a rectangle that represents the cropping.
- Click on the second oposite corner of the rectangle
- Fine tune by zooming, panning and dragging the grips of the resulting rectangle
- Hit ENTER/RETURN to commit.
NOTE: Sometimes our transformation action leaves some transparent pixels on the margins of the image. Take care with those while cropping.
Cropping 1[edit]
Cropping 2[edit]
After cropping we can turn on Wrap Around Mode and also Toggle Guide Visibility off. Hit W and go to View > Guides.
Removing Soft Shadow Effects[edit]
We now have a fairly good geometric match but, in terms of colors and texture.
There are also areas of the image that are much darker than others.
This is usually due to the vignetting effect that is either introduced by the camera that shot the photo or by post production effects on the original image. It might also be related to some objects casting shadows on the geometry that were impossible to remove on the original photo. If these shadows are soft we can try to remove them, but if they are hard shadows removing them will be very difficult.
We will try to get rid of these soft shadows or vignetting in a fast way, using pixel information on the original layer:
- Make sure that Wrap Around Mode is Turned On
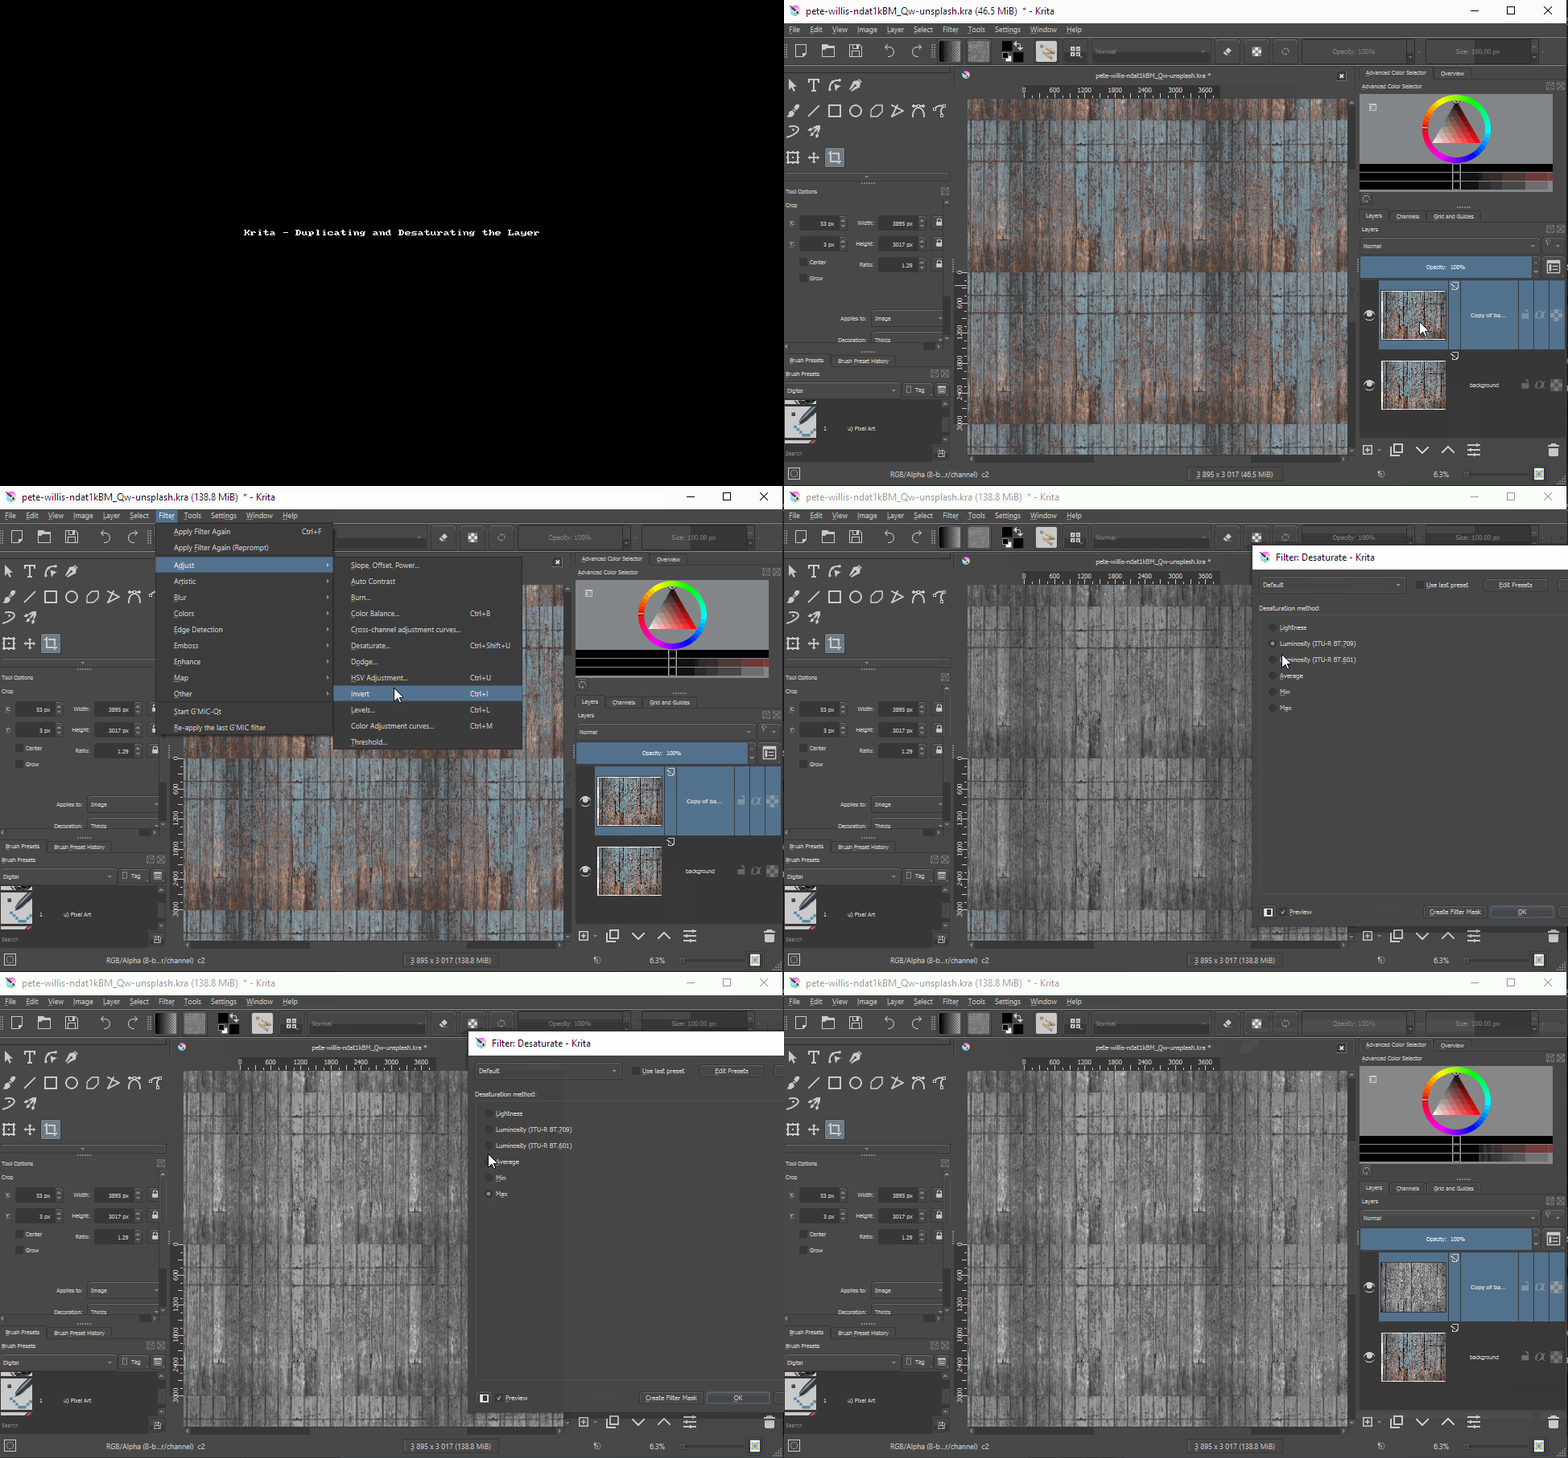
- On the Layers Docker, Duplicate the background layer, by Right Click on it and choosing Duplicate Layer or Mask
- Desaturate the new Layer by clicking on it and going to Filter > Adjust > Desaturate.
- You can accept the standard desaturation mode but usually it’s better to use the one that gives you higher contrast.
The next step will be using the desaturated Layer to remove shadow information to the background image:
- Make sure the Desaturated Layer is selected and change it’s blending mode to Grain Extract.
- Do this by clicking to the Layer Blend Modes Dropdown Menu on the top of the Layers Panel. It’s a button that reads Normal, above the Opacity Slider.
- You’ll find Grain Extract in the Mix submenu in the bottom of the list.
- While you’re at it click the tick box next to Grain Extract to make it a Favourite. It will now be readily accessible at the top of the list.
- You’ll notice that the result of the Grain Extract blend mode will be an image with basic raw colors, where the darkest pixels have been reduced to grey.
- Now we’ll blur the image by going to Filter > Blur > Gaussian Blur.
- Slide any of the sliders to something about 100. You can push for more if shadows are really soft and less if shadows are harder.
- You’ll notice texture detail starting to pop up again. The image will increase texture definition while also getting rid of the shadow fills caused by soft shadows or vignetting.
- Finally fine tune the Opacity slider of this Layer. You'll have a less intense effect and you can keep fine tuning opacity until you feel it’s right.
The idea here is to get rid of darker areas and projected shadow artifacts to get the basic colors with no lighting info. The lighting info will be given by your render engine when it renders. Having shadows on the texture would create noticeable errors on your final image, as the lighting effects that would be present on the texture would conflict with the light being produced by the render engine on the surface.
This final output, is often called BaseColor or Albedo in render or game engines. Of course this isn't a scientific way of having accurate albedo textures but it's a way to remove shadow information, thus getting the final texture closer to it.
There are a lot of situations where the desired result is not a more accurate rendering texture, but rather an expressive tiling texture. If that is the case you can skip this process.
Save a Duplicate of Your File and Merge Layers[edit]
When you’re happy with the results you will have to consolidate the final image by merging Layers. If you don’t do this the final step will not work right as it requires a single Layer. In order not to loose the possibility of fine tuning the current result later, and using less of an Albedo and more of the Original image expression, you should now save a duplicate and perform the layers merge on a new file:
- Save your file with a different name using File > Save As;
- Save it again with the final name using File > Save As again;
- Right click on the Desaturated layer and select Merge Layers.
- Save the file again but now you can use a regular File > Save.
Removing Seams and Exceptional Features[edit]
The final step of the process involves removing seams and, if you really want to be precise, removing exceptional features. Seams will be the obvious issue that breaks texture continuity, however, exceptional features on a texture, also contribute to see the pattern repetition and break realism.
Though the concept is very easy to grasp, this is the most demanding part of the process, as it involves using a Clone tool.
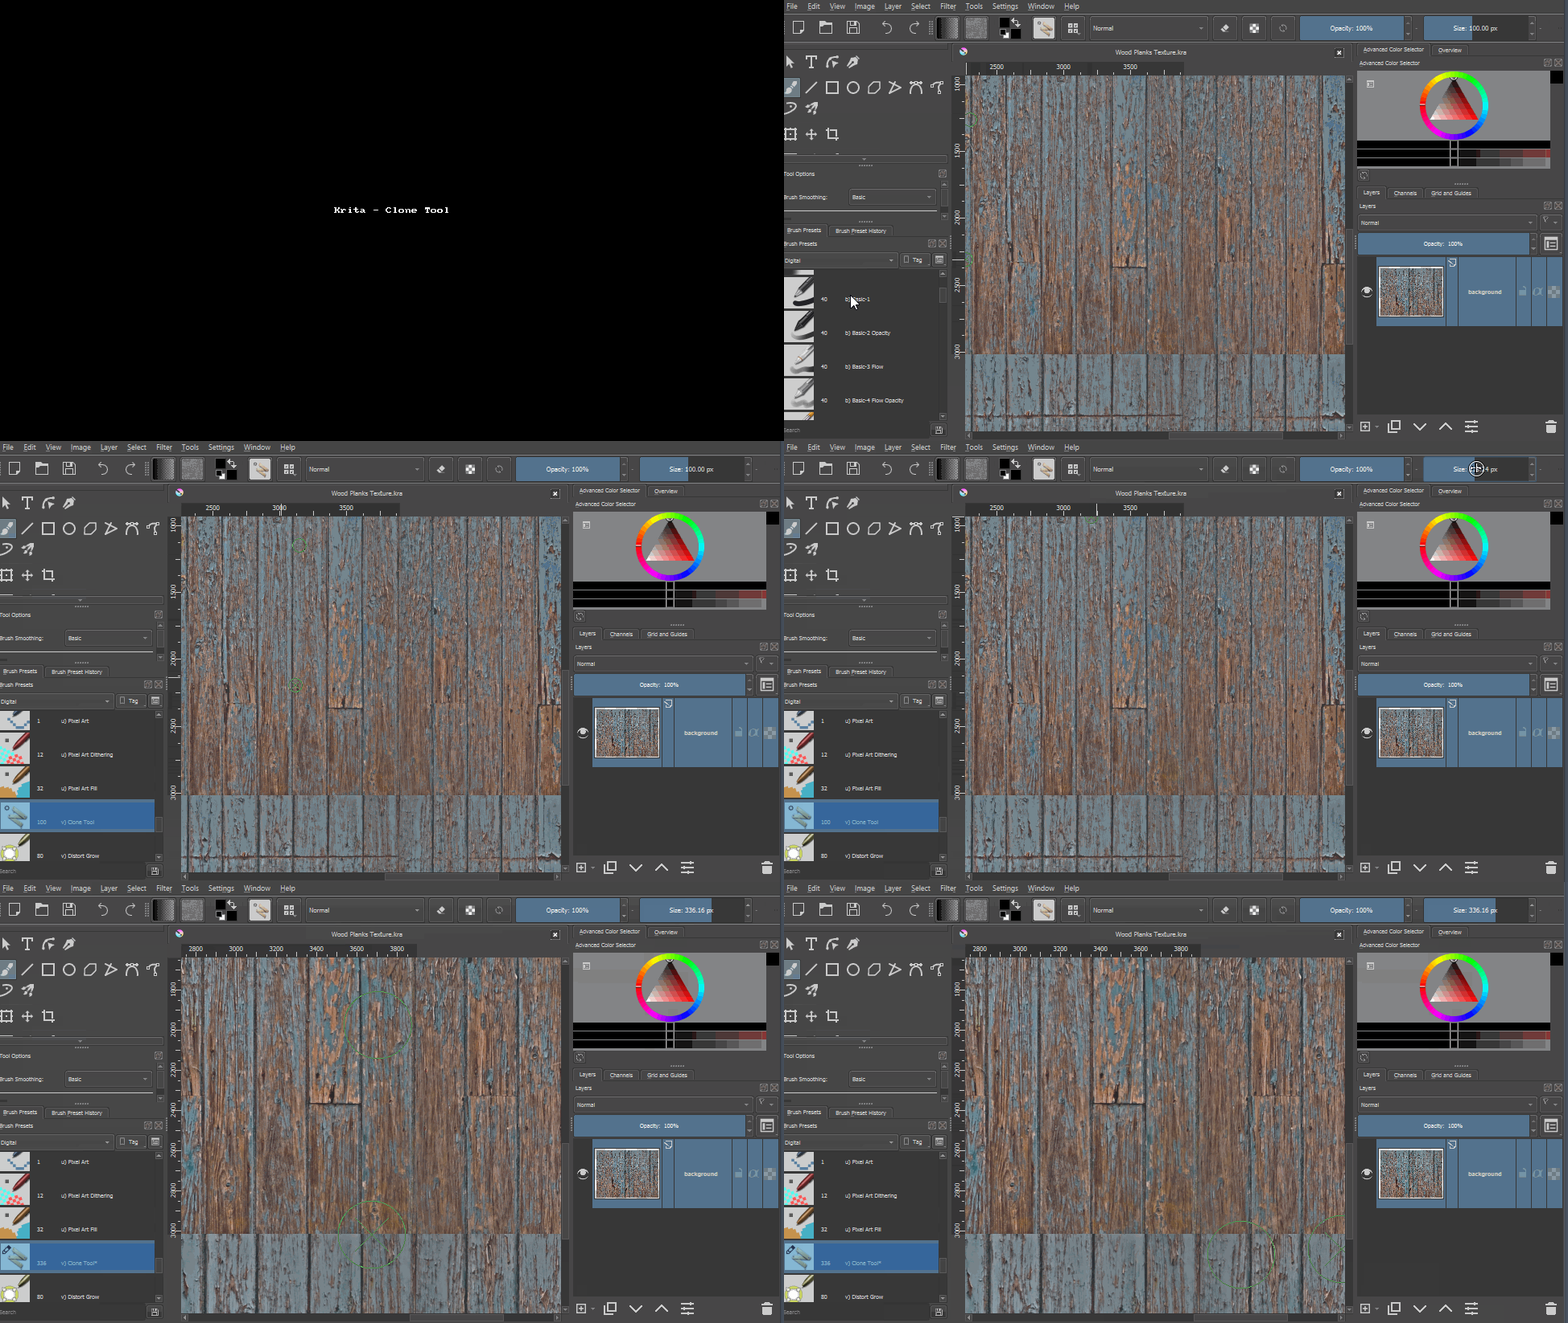
You’ll notice that Krita’s clone tool isn’t an individual tool as it is in most image editing software as Photoshop, Affinity or Gimp. What happens is that Krita has a very powerful brush system and any of it’s brushes can be converted into a clone tool.
I’m not going to go deep into that regard though, as one of Krita’s brushes is the Clone tool and it works very well. You just have to search for it, among the hundreds of brushes there are available like this:
- On the Brush Presets Docker click on the Dropdown List on top of the Docker.
- You'll find the Digital Submenu on the List;
- The Clone Tool in at the bottom of the Digital Submenu's List. It's a folding ruler icon and it's very easy to miss it, so pay attention to the gif below.
- To work with it you can leave default values and just change the Brush Size in the top bar or, if you want to work faster, hold down SHIFT+Left Click and Drag the Mouse Left or Right to decrease or increase the Brush’s size.
- You’ll also notice that the brush pointer has two circles. One is the actual Brush and the other represents the part of the image being cloned when you click on the brush. To use the brush you must first find which part of the image to reference. To do that, you hold CTRL key and click on your image.
Removing Seams[edit]
In this case we’ll have a very difficult task ahead as we will have to break a huge color difference from the bottom to the top. At the same time we have to keep an eye on geometrical features in the image and try to follow them.
Being careful where to pick the reference and where to click as well as on how big should the Clone brush be isn't easy and will require a trial and error approach. Use CTRL+Z for undo and CTRL+SHIFT+Z to redo.
At the end what matters in this process is that if it looks right it’s because it is right.
NOTE: The tricky part on the image above was how to remove seams and make a nice transition between colors. I've used one of the existing lines to create that transition. Sometimes it's not that easy so choose your base images wisely or be prepared for extra work.
Removing Prominent Features and Details[edit]
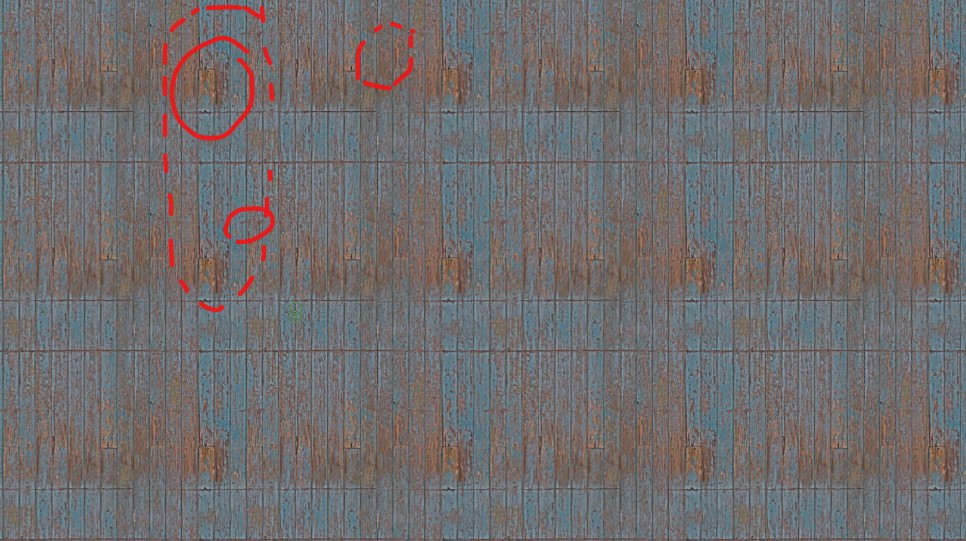
We've removed seams and the color transitions are believable. However, zooming out, we can clearly see repetition patterns arising on the most prominent features:
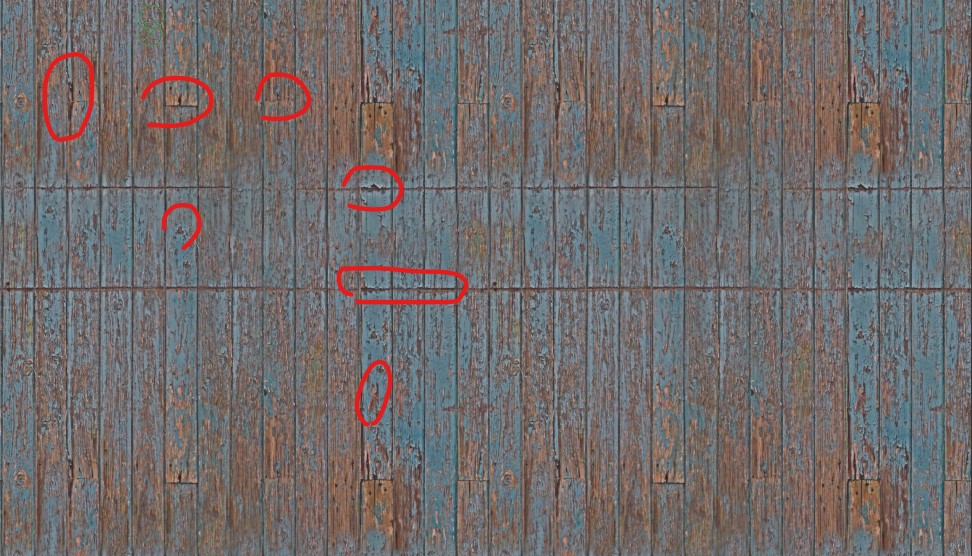
If we zoom in a bit we can also see even more evident repetition, in this case of some details:
We should consider what to do with these as:
- Imperfections matter for the quality of some materials. Without them the materials will be less interesting.
- O bigger surfaces like bigger buildings, those features might cause a lot of harm to images as they make it easy to tell they are rendered. If you're not seeking to make realistic renders you might ignore the following steps, otherwise, as the tiling they produce is obvious those can also be addressed.
For the sake of this tutorial, using the clone tool again, we will remove them:
Final Output[edit]
You have to consider what will be the purpose of the final image. If it will be used in any offline renderer the size of the image is irrelevant as long as you have RAM or VRAM available in your system to hold up all the assets of your render. However, if you’re going to use the image in realtime render engines you should consider that a square image with a power of two pixel size might be mandatory.
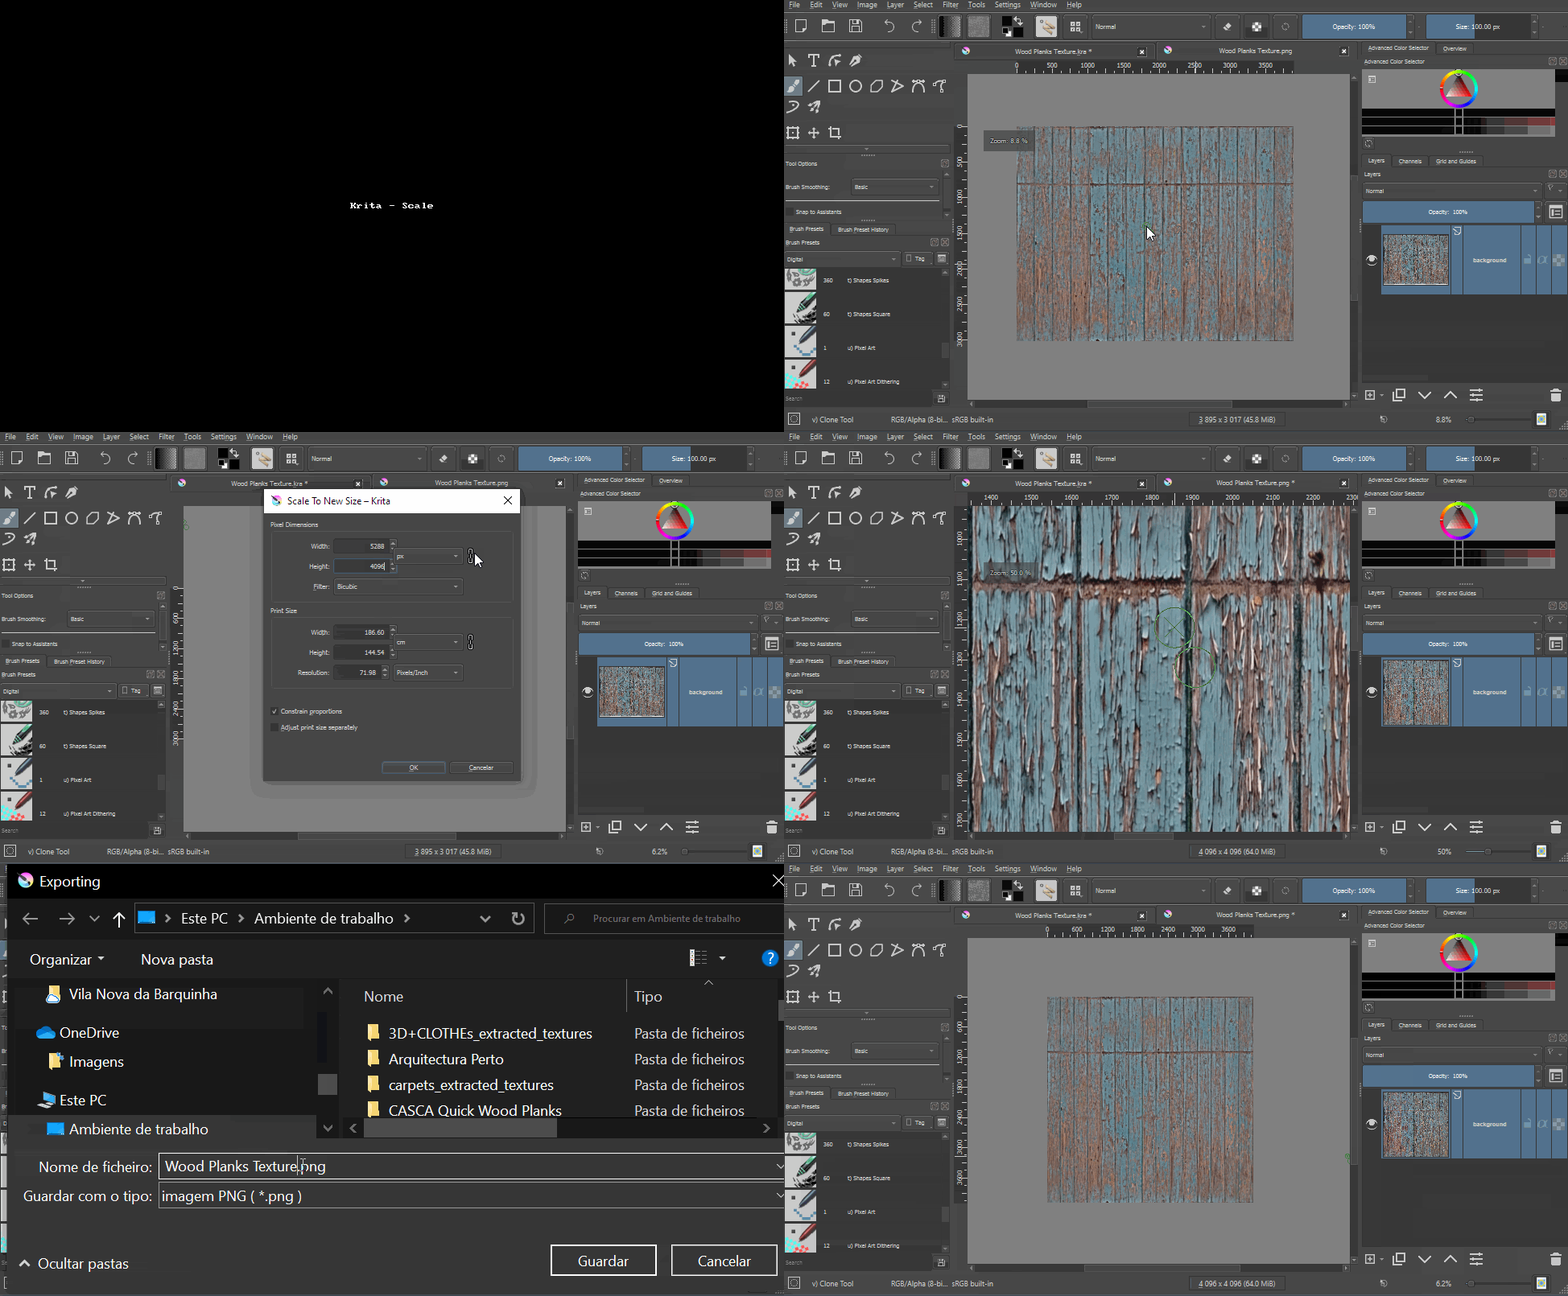
I always export as a power of two version for flexibility as I can reuse that image in all render engines I use. However, with images like this, which are very far from square, I first export it at real size and then create a second version as power of two, so I don't loose the original definition, if I need it for some reason.
Export at Real Size[edit]
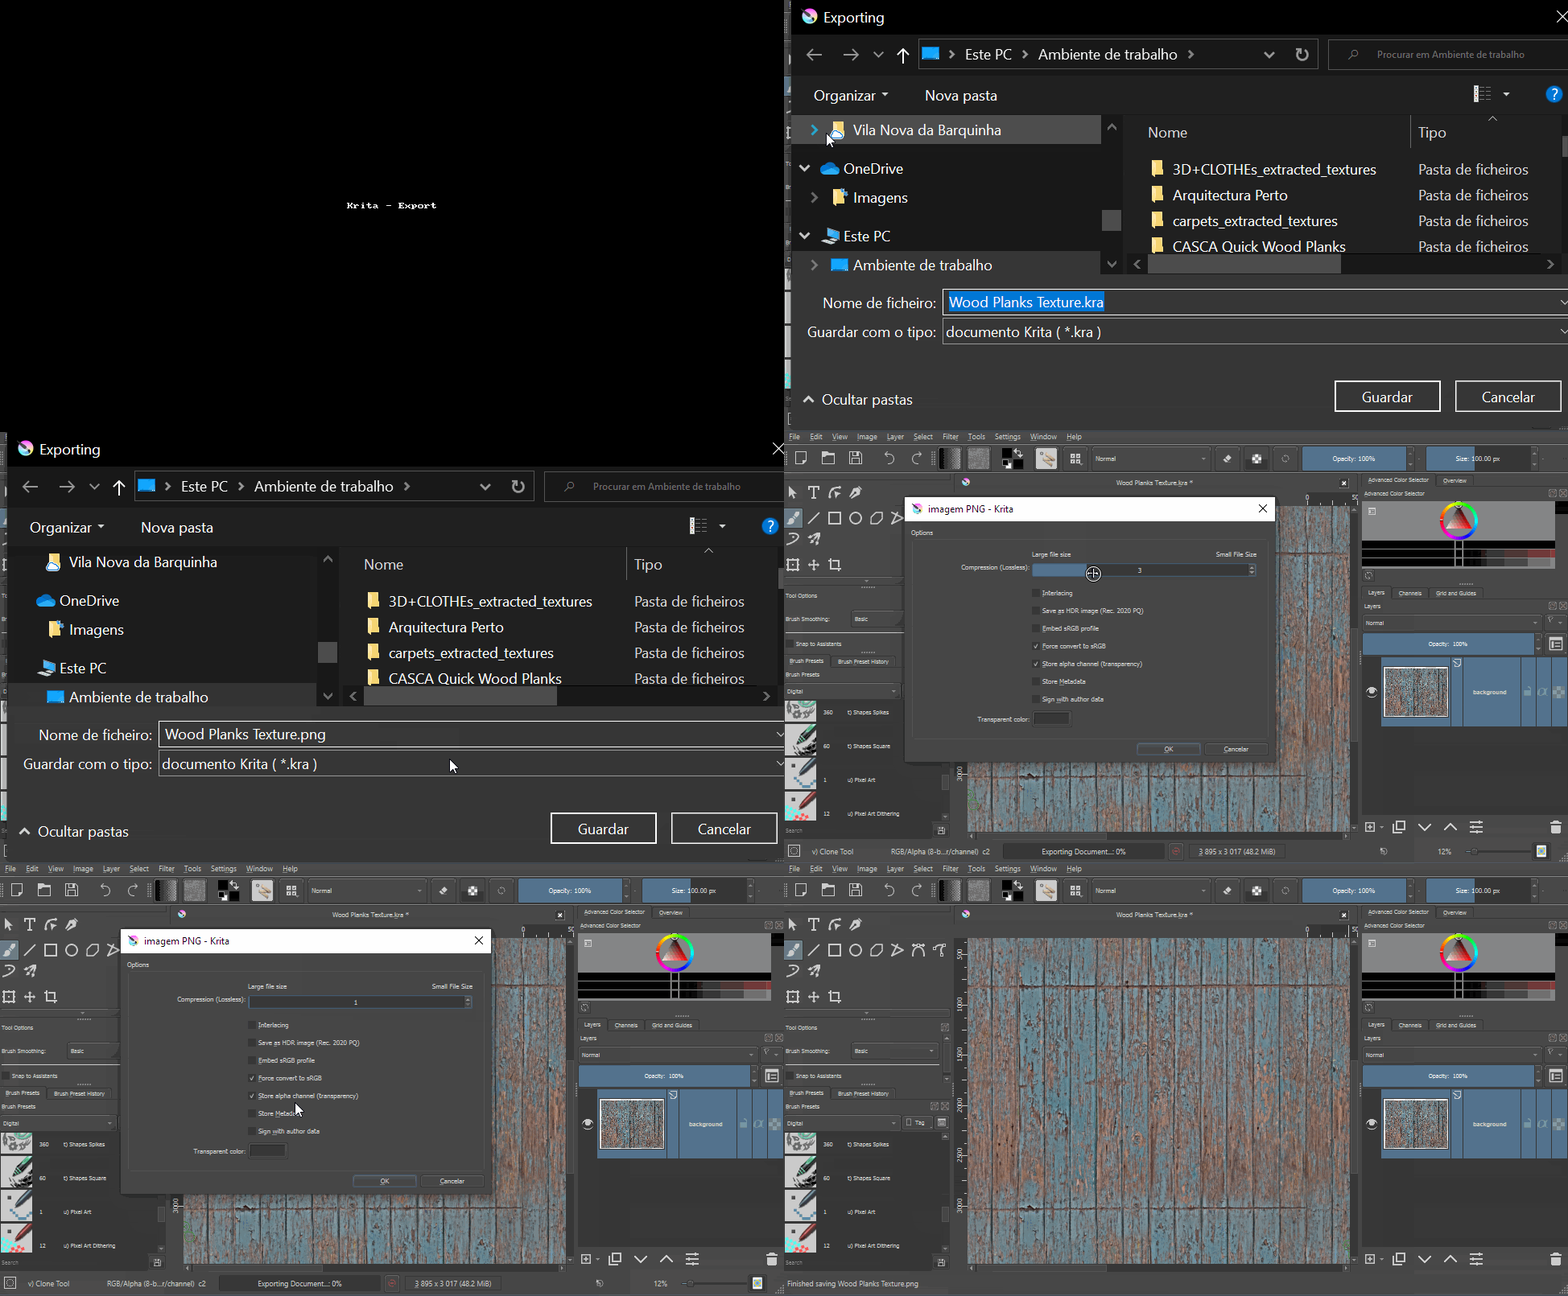
To export the image you go to File > Export and replace the extension from .kra (Krita’s native file format) to the format of your liking. Usually people choose .jpg as it's lighter. I tend to prefer .png so I can later add transparency to it if I like, without having to change a .jpg to a .png and then having to replace the image on my render engine. This way I always use .png files and further edit them if needed. Also, .png files allow images to hold more color information, if the original image is more than 8bit color depth (exr, tif and hdr files can store up to 32bit of color info and png can store up to 16bit). This was not the case as the original image was a .jpg.
In the following example I do not use compression for saving the image but that is usually overkill as the size of the image will be very big. Having no compression will only allow me to further edit it if I like, without loosing quality with each edit.
Export as power of two version[edit]
To play it safe I don’t like to scale the .kra working file, I tend to save a lot so I will proably ruin it. So I open the exported version instead, scale it to the power of two and then export it. If I happen to accidently save it, I will only ruin the first export.
Most used power of 2 image sizes are the following:
- 512px*512px
- 1024px*1024px
- 2048px*2048px - often called 2k
- 4096px*4096px - 4k
- 8192px*8192px - 8k
We can keep going up the scale, but 8k is already a very heavy image that consumes a lot of RAM and, these days, with GPU rendering, a lot of VRAM, which is limited in our Graphics Processing Units. Also consider that each material will use more than one texture so the BaseColor texture can go along very heavy textures like Normal Maps which are also colored.
Final thoughts[edit]
I’m not a professional renderer, just an architect that considers rendering as a part of the process and the best way to integrate materiality into the conceptual process.
As an architect I don’t really like to waste time with too much work but I do like to have things looking good. In that sense, this is the fastest way to create a good quality seamless texture I know of, and I do use Substance tools, Affinity Photo, Gimp and have tried many others in the past. This is the one that yields the best results, with minimum control too.
Having said that, for I don’t usually deal with very geometric patterns unless I’m creating them from scratch. That might get tricky but it will be tricky with every software.
I hope it’s been useful and I also hope you’ll consider Krita as an extra tool in your arsenal and explore it’s huge creative potential. It won’t let you down.
All the best and see you next time,
João Queiroz e Lima casca.pt
