BlenderBIM Add-on Adding labels linked to properties and quantities
Please remove this "BlenderBIM_Addon_Documentation" template.
Displaying data[edit]
Each element in a BIM model usually contains a lot of data. The data can obviously be accessed by using a dedicated BIM viewer or read directly by a machine, however, very often a simple graphical way is still necessary. BlenderBIM add-on uses a system of variables which can be linked to object properties or quantities and which then get dynamically replaced with the actual linked value on 2D view export.
The most common uses of this feature include:
- room tags
- door/window tags
- fire ratings
- staircase labels
- element composition tags etc.
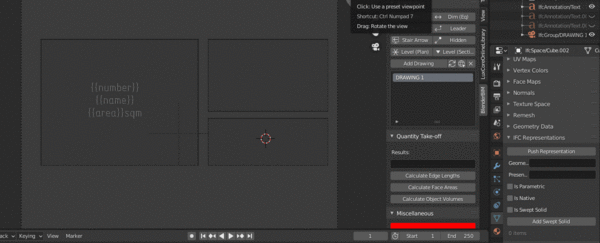
There is currently no way to see the actual value in the main Blender UI window.
Adding a text with a variable[edit]
When working with BIM objects in Blender, it's often necessary to display specific properties of an object as a label. The BlenderBIM Add-on provides a powerful system for linking labels to object properties using variables. This section will guide you through the process of creating and using these linked labels.
For a text object to show a property value of an element, three conditions are necessary:
- The text object has to be linked to the element
- A variable name has to be declared in the text object and it must be linked to a property of the element
- The variable name must be included in the text object (in double curly brackets)
To add a variable text object:
- Create a new text with Add>Text and manually link it to an object
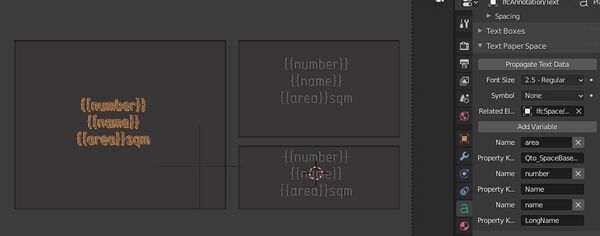
- Exit the edit mode, go to Object Data Properties > Text Paper space and pick an object in the Related Element field
- To declare a variable, go to Object Data Properties > Text Paper space, click on "Add variable" and fill in the variable name
- The variable must be linked to an object property by filling in the Property Key field
Basic Syntax[edit]
To link a label to an object property, use the following syntax in your text object:
{{property.Name}}
Where property is the type of property you're referencing, and Name is the specific property name.
Common Property Types[edit]
Here are some common property types you can use:
Type Properties[edit]
{{type.Name}}- This references properties related to the object's type
- Example: For a door,
{{type.Name}}might display "3680R" (the door type)
Attributes[edit]
Attributes are referenced simply by name:
{{PredefinedType}}- Predefined properties in the IFC schema{{GlobalId}}- Unique identifier of the object{{Name}}- Name of the object{{Description}}- Description of the object{{ObjectType}}- Object type{{Tag}}- Tag property of the object
Pset Properties[edit]
Properties are referenced by name, prefixed with Pset_Name:
{{Pset_Name.PropertyName}}- Example:
{{Pset_SpaceCommon.NetPlannedArea}}
Quantity Properties[edit]
Quantities are referenced by name, prefixed with Qto_Name:
{{Qto_Name.QuantityName}}- Example:
{{Qto_SpaceBaseQuantities.NetFloorArea}}
Material Properties[edit]
Make sure to assign the material in 'IFC Object Material':
- Material Name:
{{material.Name}} - Material Layer Set Name:
{{material.LayerSetName}} - Material Name (alternative):
{{material.item.Material.Name}} - Material Layers Name:
{{material.MaterialLayers.Name}}
Alternative ways to reference material properties:
{{material.item.Name}}{{"material"."item"."Name"}}{{r"material"."item"."Name"}}{{mat.i.Name}}
Custom Properties[edit]
Custom properties (for example in parametric objects) are referenced by name:
- Example:
{{Width}}
Advanced Usage[edit]
You can use the double backtick command to run custom evaluations:
- Get the material name assigned to the 1st material layer:
``{{material.item.Material.Name}}[0]``
- Display the total layer thickness rounded to 2 decimal points:
``round(sum({{mat.i.LayerThickness}}),2)``
- Check if an object has a specific status:
``{{r"Pset_.*Common"."Status"}}[0]`` = EXISTING (for example)
``{{r"Pset_.*Common"."Status"}}[0][:2]`` = EX (for example)
- Convert a quantity to a different unit:
``int({{Qto_SpaceBaseQuantities.NetFloorArea}})`` SF = 350 SF (for example)
Remember to link your text object to the BIM object and declare the variable name in the text object, linking it to a property of the element. The variable name must be included in the text object using double curly brackets Template:Like this.
By using these syntaxes and techniques, you can create dynamic labels that update automatically based on the properties of your BIM objects in Blender.
Labeling multiple objects[edit]
A semi-automatic way to do this whole process is to select objects to be tagged and use the "N" panel > BlenderBIM > Annotation > Text - this creates a text object for every selected element and links it automatically. (Important: The texts are placed relative to the active Drawing camera, the command will fail if there is no drawing camera present!) Then select one of the created texts, add the desired variables and formatting, select the other texts again and use Object Data Properties > Text Paper space > Propagate Text Data to apply the same variables and formatting on all selected.
Note that the default style of IfcSpace after export is no fill and no border, which makes it invisible and harder to select with the default Inkscape settings.
Calculations inside labels[edit]
The exporter interpreting the variable also evaluates python functions included in the Property key field. This enables for example simple calculations like rounding - round({{BaseQuantities.GrossFloorArea}},1), unit conversion, etc.


