Difference between revisions of "BlenderBIM Add-on/BlenderBIM Costing"
Sigmadesigns (talk | contribs) |
m (Duncan moved page BlenderBIM Costing to BlenderBIM Add-on/BlenderBIM Costing) |
||
| (34 intermediate revisions by one other user not shown) | |||
| Line 1: | Line 1: | ||
{{BlenderBIM_Add-on_Documentation}} | {{BlenderBIM_Add-on_Documentation}} | ||
| − | == | + | =W.I.P. Demonstrations= |
| − | + | ==Live Session 1 15/05/2021== | |
| − | + | ===Main Topics=== | |
| − | + | # How to convert IFC2x3 to IFC4 | |
| − | + | # Discovering the Scheduling Tools | |
| + | # Discovering the Costing Tools | ||
| + | # Discovering the Quantity Take Off Tools | ||
| + | ===Video Demo=== | ||
<div><youtube width="600" height="340">https://www.youtube.com/embed/lTUsC6OE01k</youtube></div> | <div><youtube width="600" height="340">https://www.youtube.com/embed/lTUsC6OE01k</youtube></div> | ||
| + | ===Sample Files=== | ||
| + | =Project Setup and Costing Tools= | ||
==Project setup== | ==Project setup== | ||
* Option 1: Native authoring of IFC in BlenderBIM | * Option 1: Native authoring of IFC in BlenderBIM | ||
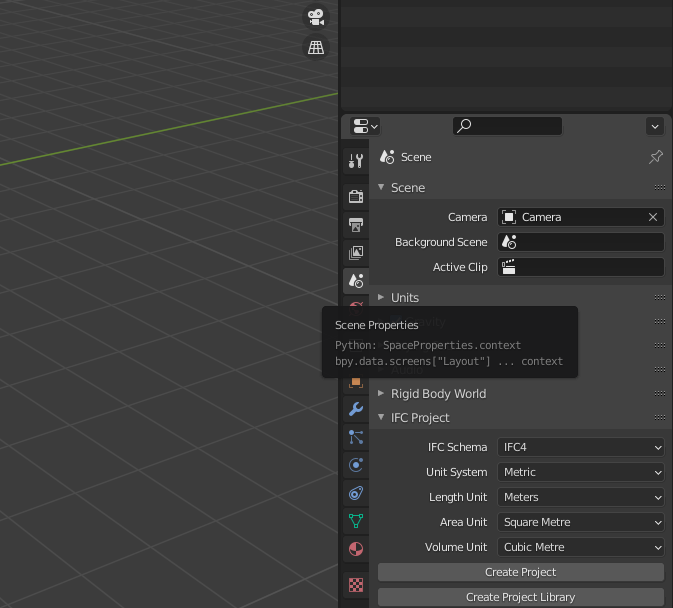
| − | + | [[File:Create project.png|200px|frame|center|Quick Project Setup, Schema and Data directories]] | |
| − | + | # You can find the command in Blender under Scene > IfcProject > Create Project | |
| − | [[File: | + | # Make sure to use IFC4, otherwise convert your IFC2x3 file to IFC4 |
* Option 2: Importing an .ifc file | * Option 2: Importing an .ifc file | ||
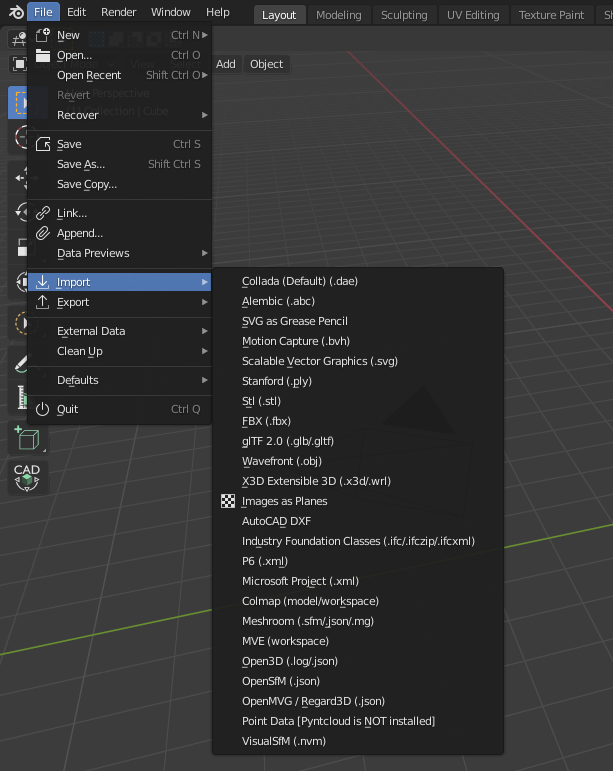
| − | + | [[File:Import file.png|200px|frame|center|Import Industry Foundation Classes .ifc]] | |
| − | + | # Go to File --> Import --> Industry Foundation Classes | |
| − | + | # Navigate to your .ifc file and Click Import | |
==Creating a Cost Schedule== | ==Creating a Cost Schedule== | ||
| − | Insert | + | ''Entity Definition'' of [https://standards.buildingsmart.org/IFC/RELEASE/IFC4/ADD1/HTML/schema/ifcsharedmgmtelements/lexical/ifccostschedule.htm IfcCostSchedule] <br> |
| + | ''An IfcCostSchedule brings together instances of IfcCostItem either for the purpose of identifying purely cost information as in an estimate for constructions costs or for including cost information within another presentation form such as a work order.'' | ||
| + | |||
| + | Cost Schedules can be added under the Blender Scene Properties > IFC Cost Schedules Panel. | ||
| + | |||
| + | Clicking "+ Add Cost Schedule" will add as many schedules as required. | ||
| + | |||
| + | |||
| + | |||
| + | ===Editing attributes=== | ||
| + | Before populating our Cost Schedules with cost items, it is best to give further information about the Cost Schedules. | ||
| + | This is done by editing the Cost Schedules attributes, by clicking on the "Grease Pencil" | ||
| + | |||
| + | |||
| + | A Cost Schedule has the following attributes you can edit: | ||
| + | *Name, | ||
| + | *Description, | ||
| + | *Identification, | ||
| + | *Status (PLANNED, APPROVED,AGREED,ISSUED,STARTED), | ||
| + | *Submitted On, | ||
| + | *Update Date, | ||
| + | |||
| + | Note: The Cost Schedule's Predefined Type can either be chosen from the dropdown list, or set as "USERDEFINED". If the latter is set as "USERDEFINED", then the attribute Object Type should denote the particular type that further defines the object.<br> | ||
| + | |||
| + | ===Creating Cost Items=== | ||
| + | ''Entity Definition'' of [https://standards.buildingsmart.org/IFC/RELEASE/IFC4/ADD1/HTML/link/ifccostitem.htm IfcCostItem]<br> | ||
| + | ''An IfcCostItem describes a cost or financial value together with descriptive information that describes its context in a form that enables it to be used within a cost schedule. An IfcCostItem can be used to represent the cost of goods and services, the execution of works by a process, lifecycle cost and more.'' | ||
| + | |||
| + | Refering to the figure below, and the attached template, a basic cost item structure would look like this: | ||
| + | |||
| + | [Insert Figure] | ||
| + | [Insert Template] | ||
| − | + | The parent items should contain calculations of overall quantities and/or overall costs, whilst the related nested items would contain the specific quantites and costs of assigned Building Elements, Processes, or Resources. | |
| − | |||
| − | == | + | ===Adding Cost Item Values=== |
Insert Content Here | Insert Content Here | ||
| − | == Creating Cost Item | + | ===Creating Cost Item Quantities=== |
Insert Content Here | Insert Content Here | ||
| − | == | + | ===Assigning Building Elements to Cost Items=== |
Insert Content Here | Insert Content Here | ||
| − | == | + | ===Deriving Quantities from linked Building Element Quantities=== |
Insert Content Here | Insert Content Here | ||
| − | == | + | ===Caclulating Cost Item Totals=== |
| − | + | # Component Values and how to use them | |
| + | # Calculating overall cost based on nested cost items | ||
| − | == Copying | + | ==Useful Tools== |
| + | ===Copying Unit Costs between cost items=== | ||
Insert Content Here | Insert Content Here | ||
| − | == | + | ===Quantity Take off Tools=== |
| − | + | # Derive Heights, Areas, Volumes | |
| − | + | # Derive formwork areas | |
| + | =Creating Project Libraries= | ||
| − | + | =Deriving Cost items from Processes= | |
| − | == | ||
| − | |||
| − | |||
| − | + | =Deriving Costs items from Resources= | |
| − | + | =Creating Schedule of Rates based on Processes, Resources and Products= | |
| − | + | =Sample Files= | |
- .ifc template for costing | - .ifc template for costing | ||
[[Category:Blender]] [[Category:BlenderBIM Add-on]] [[Category:BlenderBIM Costing]] | [[Category:Blender]] [[Category:BlenderBIM Add-on]] [[Category:BlenderBIM Costing]] | ||
Latest revision as of 10:00, 27 July 2022
Please remove this "BlenderBIM_Addon_Documentation" template.
W.I.P. Demonstrations[edit]
Live Session 1 15/05/2021[edit]
Main Topics[edit]
- How to convert IFC2x3 to IFC4
- Discovering the Scheduling Tools
- Discovering the Costing Tools
- Discovering the Quantity Take Off Tools
Video Demo[edit]
Sample Files[edit]
Project Setup and Costing Tools[edit]
Project setup[edit]
- Option 1: Native authoring of IFC in BlenderBIM
- You can find the command in Blender under Scene > IfcProject > Create Project
- Make sure to use IFC4, otherwise convert your IFC2x3 file to IFC4
- Option 2: Importing an .ifc file
- Go to File --> Import --> Industry Foundation Classes
- Navigate to your .ifc file and Click Import
Creating a Cost Schedule[edit]
Entity Definition of IfcCostSchedule
An IfcCostSchedule brings together instances of IfcCostItem either for the purpose of identifying purely cost information as in an estimate for constructions costs or for including cost information within another presentation form such as a work order.
Cost Schedules can be added under the Blender Scene Properties > IFC Cost Schedules Panel.
Clicking "+ Add Cost Schedule" will add as many schedules as required.
Editing attributes[edit]
Before populating our Cost Schedules with cost items, it is best to give further information about the Cost Schedules. This is done by editing the Cost Schedules attributes, by clicking on the "Grease Pencil"
A Cost Schedule has the following attributes you can edit:
- Name,
- Description,
- Identification,
- Status (PLANNED, APPROVED,AGREED,ISSUED,STARTED),
- Submitted On,
- Update Date,
Note: The Cost Schedule's Predefined Type can either be chosen from the dropdown list, or set as "USERDEFINED". If the latter is set as "USERDEFINED", then the attribute Object Type should denote the particular type that further defines the object.
Creating Cost Items[edit]
Entity Definition of IfcCostItem
An IfcCostItem describes a cost or financial value together with descriptive information that describes its context in a form that enables it to be used within a cost schedule. An IfcCostItem can be used to represent the cost of goods and services, the execution of works by a process, lifecycle cost and more.
Refering to the figure below, and the attached template, a basic cost item structure would look like this:
[Insert Figure] [Insert Template]
The parent items should contain calculations of overall quantities and/or overall costs, whilst the related nested items would contain the specific quantites and costs of assigned Building Elements, Processes, or Resources.
Adding Cost Item Values[edit]
Insert Content Here
Creating Cost Item Quantities[edit]
Insert Content Here
Assigning Building Elements to Cost Items[edit]
Insert Content Here
Deriving Quantities from linked Building Element Quantities[edit]
Insert Content Here
Caclulating Cost Item Totals[edit]
- Component Values and how to use them
- Calculating overall cost based on nested cost items
Useful Tools[edit]
Copying Unit Costs between cost items[edit]
Insert Content Here
Quantity Take off Tools[edit]
- Derive Heights, Areas, Volumes
- Derive formwork areas
Creating Project Libraries[edit]
Deriving Cost items from Processes[edit]
Deriving Costs items from Resources[edit]
Creating Schedule of Rates based on Processes, Resources and Products[edit]
Sample Files[edit]
- .ifc template for costing

