Bonsai Add-on Importing geospatial data
From Wiki.OSArch
Goal
Creating a 3D model of a building site with contours.
What you'll need
- 3D elevation data (in my case .las scan)
- 2D data (in this case .shp landregister borders)
- BlenderGIS
- Sverchok
- Cloudcompare
Workflow
Get the data
Decide on geographical metadata
- Coordinate Reference System (CRS) representedy by an EPSG number. You'll need to reproject everything to this system, so think this through.
- Your Project Coordinate System (YPCS, I made this up to avoid confusion with projected coordinate system) which is basically the position of the project origin in your CRS and a rotation of the project grid with regard to the CRS. Keep in mind thigs are a bit easier if you avoid the rotation.
Get land registry map and elevation data. A list of public sources:
- Czech Republic https://ags.cuzk.cz/geoprohlizec/
- Austria https://www.data.gv.at/daten/inspire/
If the CRS of some of your data differs to the one you want to work with, you have to reproject (transform) it. QGis is grat for this.
Prepare the data
The first step to combining any geographical data, is to make sure it uses the same crs as your project. So make sure you download the correct version, or reproject it using qgis.
BlenderGIS can only import dxf or shp. Czech server provides land registry map as .shp, so that's solved. The DMR 5G laser scan is provided as .las point cloud so we'll use Cloudcompare to move it to YPCS and convert it to a mesh:
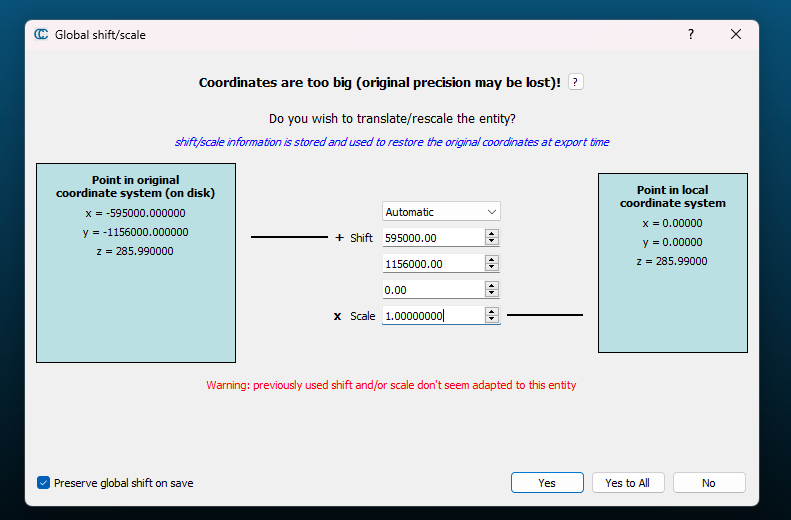
- start Cloudcompare and open the las file. When asked to transform the coordinates input your project origin (0,0 of YPCS in CRS with -) as a shift:
- Convert it to a mesh surface with Edit > mesh > Delaunay 2.5D XY Plane
- Edit > Edit global shift and scale > set to 0 (this removes the reference to the original CRS and sets origin of your mesh to your project origin)
- Save as some mesh file Blender can read, I use .obj
- Import in Blender, in case of .obj you have to specify directions of your pcs axes (usually Forward Y, Up Z)

Set up IfcProject with BlenderGIS
- Create new Bonsai project. It's easiest if you work in meters, as most geographical data are in m and you won't have to transform them.
- If you want to work in other units, I'd create the main project in your units and a landscape project in m and link them together.
- Set up geolocation in Bonsai. Go to the project tab, geolocation part. Input your CRS, YPCS coordinates and rotation.
- Set up geolocation in BlenderGIS (they're not connected with Bonsai). Go to the N panel, geolocation, set up CRS with EPSG and the coordinates of YPCS and the rotation.
Import everything
- Go to Gis import .shp and import your map data. Your map should appear close to your Blender origin, since you have set BlenderGIS YPCS up.
- Go to file import .obj and import your mesh. If you followed the guide it lands on YPCS origin, but doesn't match the rotation, so you have to manually rotate it, centered on the 0,0.
Classify elements and export
- Select the mesh, go to Element tab and classify it as IfcGeograpgicElement
- Select the map, go to edit mode, select your property lines, extract selected
- Leave edit mode, select the property lines object and replace your IfcSite representation with it
- Save your project as an ifc file and as a Blender file (keep in mind only classified elements get exported to ifc and all BlenderGIS settings and imports get lost)
- You now have a properly georeferenced project with a well defined site, project coordinate system and a model of the terrain, so you're ready to start planning
Model proposed changes
- There are many ways to model all the possible landscape features and the geometries are often very complex. Here are some common approaches:
- Use slabs and simple ramps: this is easy to work with, but usually far from reality, as most streets and parking lots are sloping in more than one direction
- Use very low poly meshes: this a good compromise between reasonable effort and flexibility, but it's necessary to use some subdivision and smoothing algorithms for visualisation
- Use hig poly sculpting techniques: this allows for high realism, but requires very good modelling skills to be effective
- Use parametric profiles with booleans : this is what professional road infrastructure planners do, because it's the most effective approach in large scale. It requires specialized software or custom scripts.
- Whatever you do, keep in mind Bonsai can not save any scripts, modifiers or geometry nodes to ifc, so always save your Blender file separately.
Generate contours
- The quality here depends fully on the quality of your terrain mesh. If you use anything else than a high poly sculpted mesh as a base, you'll likely end up with countours with sharp corners and straight edges, looking very unnatural
- The principle is always the same: generate many xy planes with a defined distance (usually 1, 5 or 10m) from each other and intersect the mesh to get the contours
- If you're familiar with Sverchok you should be easily able to create a script for this or use mine here: Mesh2Contours
- If you want to stick with vanilla blender, you can create a mesh square, scale it, add multiply modifier and slice
- Once you have your contours, don't forget to add them as a plan representation of your IfcSite