Difference between revisions of "Bonsai Add-on Importing geospatial data"
From Wiki.OSArch
| Line 39: | Line 39: | ||
=== Import everything === | === Import everything === | ||
| + | # Go to Gis import .shp and import your map data. Your map should appear close to your Blender origin, since you have set BlenderGIS YPCS up. | ||
| + | # Go to file import .obj and import your mesh. If you followed the guide it lands on YPCS origin, but doesn't match the rotation, so you have to manually rotate it, centered on the 0,0. | ||
| + | |||
=== Generate contours === | === Generate contours === | ||
=== Add annotations === | === Add annotations === | ||
Revision as of 19:19, 10 May 2025
Goal
Creating a 3D model of a building site with contours.
What you'll need
- 3D elevation data (in my case .las scan)
- 2D data (in this case .shp landregister borders)
- BlenderGIS
- Sverchok
- Cloudcompare
Workflow
Get the data
Decide on geographical metadata
- Coordinate Reference System (CRS) representedy by an EPSG number. You'll need to reproject everything to this system, so think this through.
- Your Project Coordinate System (YPCS, I made this up to avoid confusion with projected coordinate system) which is basically the position of the project origin in your CRS and a rotation of the project grid with regard to the CRS. Keep in mind thigs are a bit easier if you avoid the rotation.
Get land registry map and elevation data. A list of public sources:
- Czech Republic https://ags.cuzk.cz/geoprohlizec/
- Austria https://www.data.gv.at/daten/inspire/
If the CRS of some of your data differs to the one you want to work with, you have to reproject (transform) it. QGis is grat for this.
Prepare the data
The first step to combining any geographical data, is to make sure it uses the same crs as your project. So make sure you download the correct version, or reproject it using qgis.
BlenderGIS can only import dxf or shp. Czech server provides land registry map as .shp, so that's solved. The DMR 5G laser scan is provided as .las point cloud so we'll use Cloudcompare to move it to YPCS and convert it to a mesh:
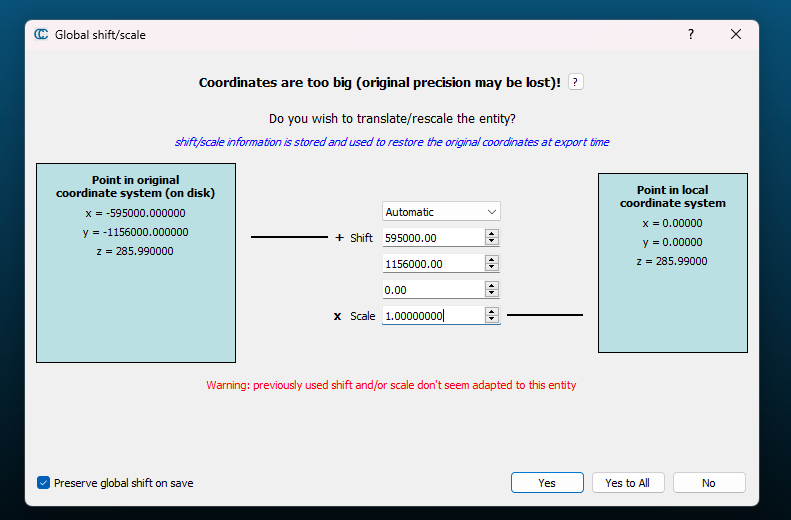
- start Cloudcompare and open the las file. When asked to transform the coordinates input your project origin (0,0 of YPCS in CRS with -) as a shift:
- Convert it to a mesh surface with Edit > mesh > Delaunay 2.5D XY Plane
- Edit > Edit global shift and scale > set to 0 (this removes the reference to the original CRS and sets origin of your mesh to your project origin)
- Save as some mesh file Blender can read, I use .obj
- Import in Blender, in case of .obj you have to specify directions of your pcs axes (usually Forward Y, Up Z)

Set up IfcProject with BlenderGIS
- Create new Bonsai project. It's easiest if you work in meters, as most geographical data are in m and you won't have to transform them.
- If you want to work in other units, I'd create the main project in your units and a landscape project in m and link them together.
- Set up geolocation in Bonsai. Go to the project tab, geolocation part. Input your CRS, YPCS coordinates and rotation.
- Set up geolocation in BlenderGIS (they're not connected with Bonsai). Go to the N panel, geolocation, set up CRS with EPSG and the coordinates of YPCS and the rotation.
Import everything
- Go to Gis import .shp and import your map data. Your map should appear close to your Blender origin, since you have set BlenderGIS YPCS up.
- Go to file import .obj and import your mesh. If you followed the guide it lands on YPCS origin, but doesn't match the rotation, so you have to manually rotate it, centered on the 0,0.