Difference between revisions of "BlenderBIM Add-on/BlenderBIM Costing"
Sigmadesigns (talk | contribs) |
|||
| (98 intermediate revisions by 3 users not shown) | |||
| Line 1: | Line 1: | ||
| + | {{BlenderBIM_Add-on_Documentation}} | ||
| + | |||
| + | =W.I.P. Demonstrations= | ||
| + | ==Live Session 1 15/05/2021== | ||
| + | ===Main Topics=== | ||
| + | # How to convert IFC2x3 to IFC4 | ||
| + | # Discovering the Scheduling Tools | ||
| + | # Discovering the Costing Tools | ||
| + | # Discovering the Quantity Take Off Tools | ||
| + | ===Video Demo=== | ||
| + | <div><youtube width="600" height="340">https://www.youtube.com/embed/lTUsC6OE01k</youtube></div> | ||
| + | |||
| + | ===Sample Files=== | ||
| + | |||
| + | =Project Setup and Costing Tools= | ||
| + | |||
| + | ==Project setup== | ||
| + | * Option 1: Native authoring of IFC in Bonsai | ||
| + | |||
| + | |||
| + | [[File:Create project 2.png|200px|frame|center|Create New Project]] | ||
| + | |||
| + | # You can find the command in Blender-Bonsai under File --> New IFC Project and Choose which unit, template, or from the wizard panel | ||
| + | # Make sure to use IFC4 or IFC4x3, otherwise convert your IFC2x3 file to IFC4 or IFC4x3 | ||
| + | |||
| + | * Option 2: Open an existing .ifc file | ||
| + | |||
| + | [[File:Open project 2.png|200px|frame|center|Open an Existing IFC Project]] | ||
| + | |||
| + | # Go to File --> Open IFC Project | ||
| + | # Navigate to your .ifc file and click Load Project or | ||
| + | |||
| + | # Open Recent IFC Project from the drop-down menu | ||
| + | |||
| + | ==Create a Cost Schedule== | ||
| + | ''Entity Definition'' of [https://standards.buildingsmart.org/IFC/RELEASE/IFC4/ADD1/HTML/schema/ifcsharedmgmtelements/lexical/ifccostschedule.htm IfcCostSchedule] <br> | ||
| + | ''An IfcCostSchedule brings together instances of IfcCostItem either for the purpose of identifying purely cost information as in an estimate for constructions costs or for including cost information within another presentation form such as a work order.'' | ||
| + | |||
| + | Cost Schedules can be added under the Blender Scene Properties > Cost and Scheduling > Cost Panel. | ||
| + | |||
| + | Clicking "+ Add Cost Schedule" will add as many schedules as required. | ||
| + | |||
| + | [[File:Wiki-Costing-001.png|200px|frame|center|Create a New IfcCostSchedule]] | ||
| + | |||
| + | Assign Name and Type, as described below in Editing attributes | ||
| + | |||
| + | ===Edit Cost Schedule attributes=== | ||
| + | Before populating our Cost Schedules with cost items, it is best to give further information about the Cost Schedules. | ||
| + | This is done by editing the Cost Schedules attributes, by clicking on the "Grease Pencil" | ||
| + | |||
| + | [[File:Edit Cost Schedule Properties.png|200px|frame|center|Edit Cost Schedule Properties]] | ||
| + | |||
| + | A Cost Schedule has the following attributes you can edit: | ||
| + | *Name, | ||
| + | *Description, | ||
| + | *ObjectType, | ||
| + | *Identification, | ||
| + | *PredefinedType, | ||
| + | *Status (PLANNED, APPROVED,AGREED,ISSUED,STARTED), | ||
| + | *Submitted On, | ||
| + | *Update Date, | ||
| + | |||
| + | Note: | ||
| + | *The Cost Schedule's Predefined Type can either be chosen from the dropdown list, or set as "USERDEFINED". If the latter is set as "USERDEFINED", then the attribute Object Type should denote the particular type that further defines the object. | ||
| + | *If "SCHEDULEOFRATES" is selected its format does not use quantities, more on this in the dedicated paragraph<br> | ||
| + | ===Create a Schedule of Rates=== | ||
| + | The purpose of the Schedule of Rates is to provide a Cost Schedule limited to the Cost Value of a Cost Item without quantities<br> | ||
| + | The same Cost Value can be assigned to a Cost Item in a, for instance, Bill of Quantities, creating a link between the two Cost Schedules. | ||
| + | |||
| + | |||
| + | [[File:Create SoR.gif|200px|frame|center|Create Cost Schedule of Rates]] | ||
| + | |||
| + | Editing of a Cost Item in the Schedule of Rates follows the same process used in other Cost Schedules. | ||
| + | |||
| + | [[File:Create SoR cost item.gif|200px|frame|center|Create Cost Item in a Schedule of Rates]] | ||
| + | |||
| + | ==Create Cost Items== | ||
| + | |||
| + | ''Entity Definition'' of [https://standards.buildingsmart.org/IFC/RELEASE/IFC4/ADD1/HTML/link/ifccostitem.htm IfcCostItem]<br> | ||
| + | ''An IfcCostItem describes a cost or financial value together with descriptive information that describes its context in a form that enables it to be used within a cost schedule. An IfcCostItem can be used to represent the cost of goods and services, the execution of works by a process, lifecycle cost and more.'' | ||
| + | |||
| + | Click on the Folder Tree to Enable Editing Cost Items | ||
| + | |||
| + | [[File:Edit Cost Schedule.png|200px|frame|center|Open a Cost Schedule for Editing]] | ||
| + | |||
| + | To add a Cost Item click on "+ Add Summary Cost" | ||
| + | |||
| + | [[File:Create Cost Item.png|300px|frame|center|Add Summary Cost]] | ||
| + | |||
| + | Refering to the figure below, and the attached template, a basic cost item structure would look like this: | ||
| + | |||
| + | [[File:Edit Cost Item 01.png|300px|frame|center|Cost Item entities]] | ||
| + | Attributes are editable directly from the panel (in the green frame) by double-clicking on them | ||
| + | *ID : the Identification value of the Cost Item, typically according to a Cost Breakdown Structure (CBS) or similar | ||
| + | *Name : the name assigned to the Cost Item or a short description of its scope | ||
| − | + | Other attributes can be edited by selecting the "Edit" icon and clicking on the "pencil" as indicated below | |
| + | |||
| + | [[File:Edit Cost Item 02.png|300px|frame|center|Cost Item Edit Menu]] | ||
| + | |||
| + | Items editable activating the Edit icon: | ||
| + | |||
| + | #Cost Item parenting hierarchy | ||
| + | #Sorting order | ||
| + | #Quantity | ||
| + | #Value | ||
| + | #Edit attributes | ||
| + | |||
| + | The parent items, or Summary Cost Items, should contain calculations of overall quantities and/or overall costs, whilst the related nested items would contain the specific quantites and costs of assigned Building Elements, Processes, or Resources. | ||
| + | |||
| + | In the image below parent Item S.01 contains the `SUM` of the child items 1.1 and 1.2 below | ||
| + | |||
| + | [[File:Edit Cost Item 03.png|300px|frame|center|Cost Item Hierarchy]] | ||
| + | |||
| + | Cost items can be further nested like in the image below where the top item contains cost items 1.1 and 1.2, and a summary cost item 1.3 which itself contains cost items 1.3.1, and 1.3.2 | ||
| + | |||
| + | [[File:Edit Cost Item 04.png|300px|frame|center|Cost Items Nested Structure]] | ||
| + | |||
| + | ===Add Cost Item Values=== | ||
| + | #Manually | ||
| + | To manually add a value to a cost item, select the item, then "Edit", and click on the "disc" icon | ||
| + | |||
| + | |||
| + | |||
| + | [[File:Cost edit.png|800px|frameless|center|edit cost item]] | ||
| + | |||
| + | now some options become available at the bottom of the panel | ||
| + | |||
| + | in this example (1) select "Fixed" from the drop-down menu, (2) enter the desired value, (3) click on "Add Value", and (4) close the cost item edit | ||
| + | |||
| + | [[File:Cost edit 2.png|800px|frameless|center|Edit cost value]] | ||
| + | |||
| + | The cost item has a value that is multiplied times the "quantity" to calculate its "Total Cost" | ||
| + | |||
| + | If the cost item represents a "Summary", or a parent of nested child cost items, the procedure is as follows: (1) Select "Sum" from the drop-down menu, (2) click on "Add Value", (3) close the cost item edit: | ||
| + | |||
| + | [[File:Cost edit 3.png|800px|frameless|center|add a sum value to a cost item]] | ||
| + | |||
| + | #From a Schedule of Rates | ||
| + | |||
| + | *open the panel "Cost Item Rates" | ||
| + | *select the Schedule of rates from the drop-down menu | ||
| + | *select the rate | ||
| + | *click on the icon to link the rate to the one in the main Cost Schedule | ||
| + | |||
| + | ===Add Cost Item Quantities=== | ||
| + | There are different ways to add a Cost Item Quantity | ||
| + | |||
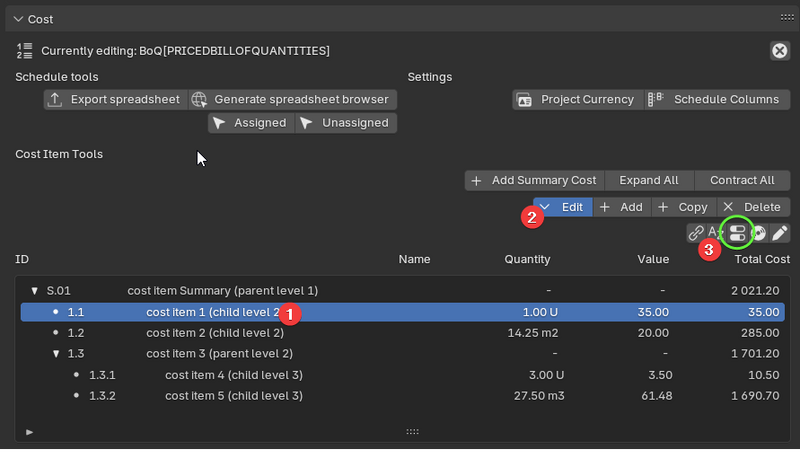
| + | # by manually enter it: (1) select the Cost Item, (2) "Edit", (3) click on the "switch" icon | ||
| + | |||
| + | [[File:Quantity edit.png|800px|frameless|center|edit quantity]] | ||
| + | |||
| + | then click on the "pencil" to edit it | ||
| + | |||
| + | [[File:Quantity edit2.png|800px|frameless|center|quantity edit 2]] | ||
| + | |||
| + | Once the panel below is available (1) enter the quantity in the box (in this case it shows CountValue, if a different unit is used, like volume or area, it may not look the same), (2) click on the tick icon to close it | ||
| + | |||
| + | [[File:Quantity edit3.png|800px|frameless|center|edit quantity step 3]] | ||
| + | |||
| + | ===Assign Building Elements to Cost Items=== | ||
| + | |||
| + | This session goes through the process of: | ||
| + | |||
| + | #perform take-off quantity of elements in the project | ||
| + | #check values in Quantity Sets automatically assigned to the elements | ||
| + | #assign quantity values to the cost items in a cost schedule | ||
| − | == | + | ===Derive Quantities from linked Building Element Quantities=== |
| − | + | Insert Content Here | |
| − | ==Cost | + | ===Calculate Cost Item Totals=== |
| − | + | # Component Values and how to use them | |
| + | # Calculating overall cost based on nested cost items | ||
| − | + | ==Useful Tools== | |
| + | ===Copying Unit Costs between cost items=== | ||
| + | Insert Content Here | ||
| − | == | + | ===Quantity Take off Tools=== |
| − | + | # Derive Heights, Areas, Volumes | |
| − | + | ## Manual quantities | |
| − | + | ## Automatic quantities | |
| − | + | ## Derive formwork areas | |
| − | |||
| − | == | + | =Creating Project Libraries= |
| − | |||
| − | |||
| − | |||
| − | |||
| − | |||
| − | |||
| − | |||
| − | + | =Deriving Cost items from Processes= | |
| − | + | =Deriving Costs items from Resources= | |
| − | + | =Creating Schedule of Rates based on Processes, Resources and Products= | |
| − | + | =Sample Files= | |
| + | - .ifc template for costing | ||
| − | + | [[Category:Blender]] [[Category:BlenderBIM Add-on]] [[Category:BlenderBIM Costing]] | |
| − | [[Category:Blender]] [[Category:BlenderBIM Add-on]] | ||
Latest revision as of 06:07, 14 April 2025
Please remove this "BlenderBIM_Addon_Documentation" template.
W.I.P. Demonstrations[edit]
Live Session 1 15/05/2021[edit]
Main Topics[edit]
- How to convert IFC2x3 to IFC4
- Discovering the Scheduling Tools
- Discovering the Costing Tools
- Discovering the Quantity Take Off Tools
Video Demo[edit]
Sample Files[edit]
Project Setup and Costing Tools[edit]
Project setup[edit]
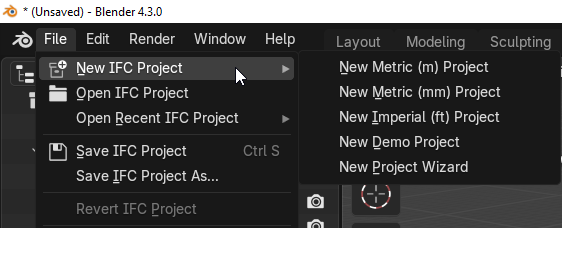
- Option 1: Native authoring of IFC in Bonsai
- You can find the command in Blender-Bonsai under File --> New IFC Project and Choose which unit, template, or from the wizard panel
- Make sure to use IFC4 or IFC4x3, otherwise convert your IFC2x3 file to IFC4 or IFC4x3
- Option 2: Open an existing .ifc file
- Go to File --> Open IFC Project
- Navigate to your .ifc file and click Load Project or
- Open Recent IFC Project from the drop-down menu
Create a Cost Schedule[edit]
Entity Definition of IfcCostSchedule
An IfcCostSchedule brings together instances of IfcCostItem either for the purpose of identifying purely cost information as in an estimate for constructions costs or for including cost information within another presentation form such as a work order.
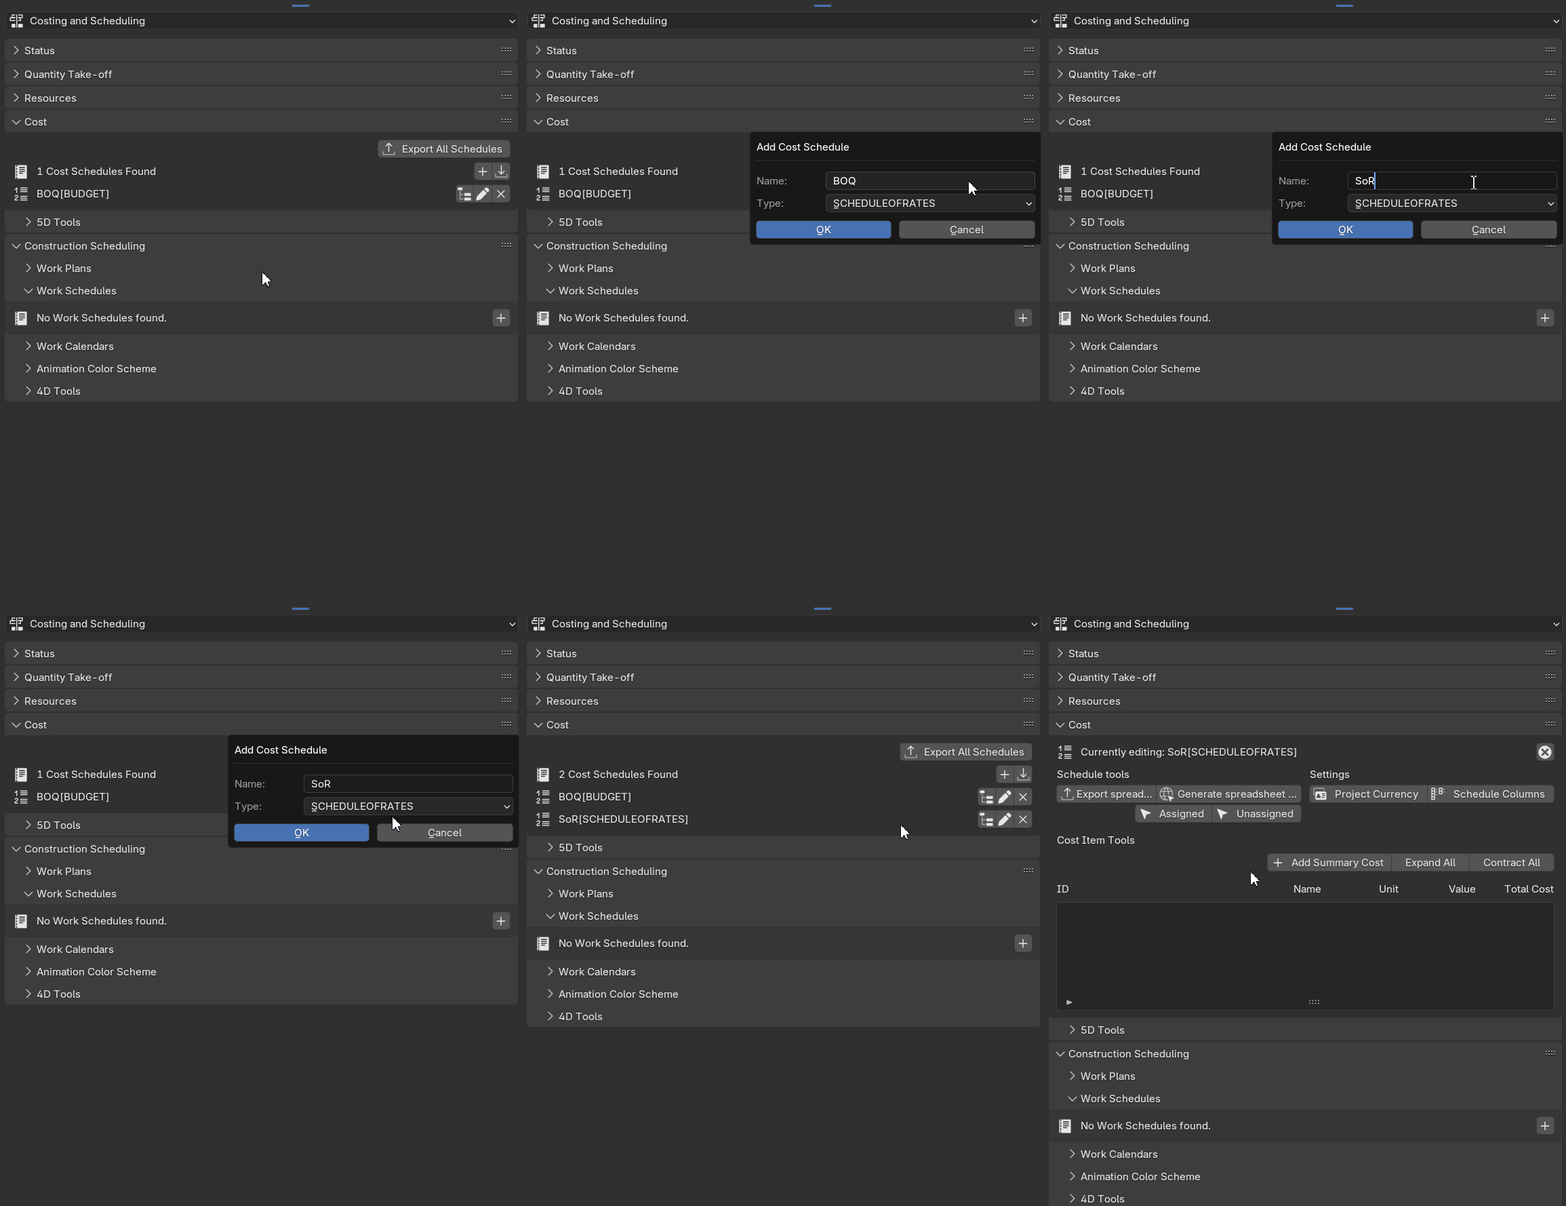
Cost Schedules can be added under the Blender Scene Properties > Cost and Scheduling > Cost Panel.
Clicking "+ Add Cost Schedule" will add as many schedules as required.
Assign Name and Type, as described below in Editing attributes
Edit Cost Schedule attributes[edit]
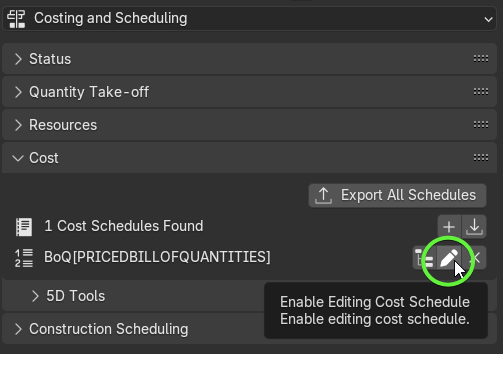
Before populating our Cost Schedules with cost items, it is best to give further information about the Cost Schedules. This is done by editing the Cost Schedules attributes, by clicking on the "Grease Pencil"
A Cost Schedule has the following attributes you can edit:
- Name,
- Description,
- ObjectType,
- Identification,
- PredefinedType,
- Status (PLANNED, APPROVED,AGREED,ISSUED,STARTED),
- Submitted On,
- Update Date,
Note:
- The Cost Schedule's Predefined Type can either be chosen from the dropdown list, or set as "USERDEFINED". If the latter is set as "USERDEFINED", then the attribute Object Type should denote the particular type that further defines the object.
- If "SCHEDULEOFRATES" is selected its format does not use quantities, more on this in the dedicated paragraph
Create a Schedule of Rates[edit]
The purpose of the Schedule of Rates is to provide a Cost Schedule limited to the Cost Value of a Cost Item without quantities
The same Cost Value can be assigned to a Cost Item in a, for instance, Bill of Quantities, creating a link between the two Cost Schedules.
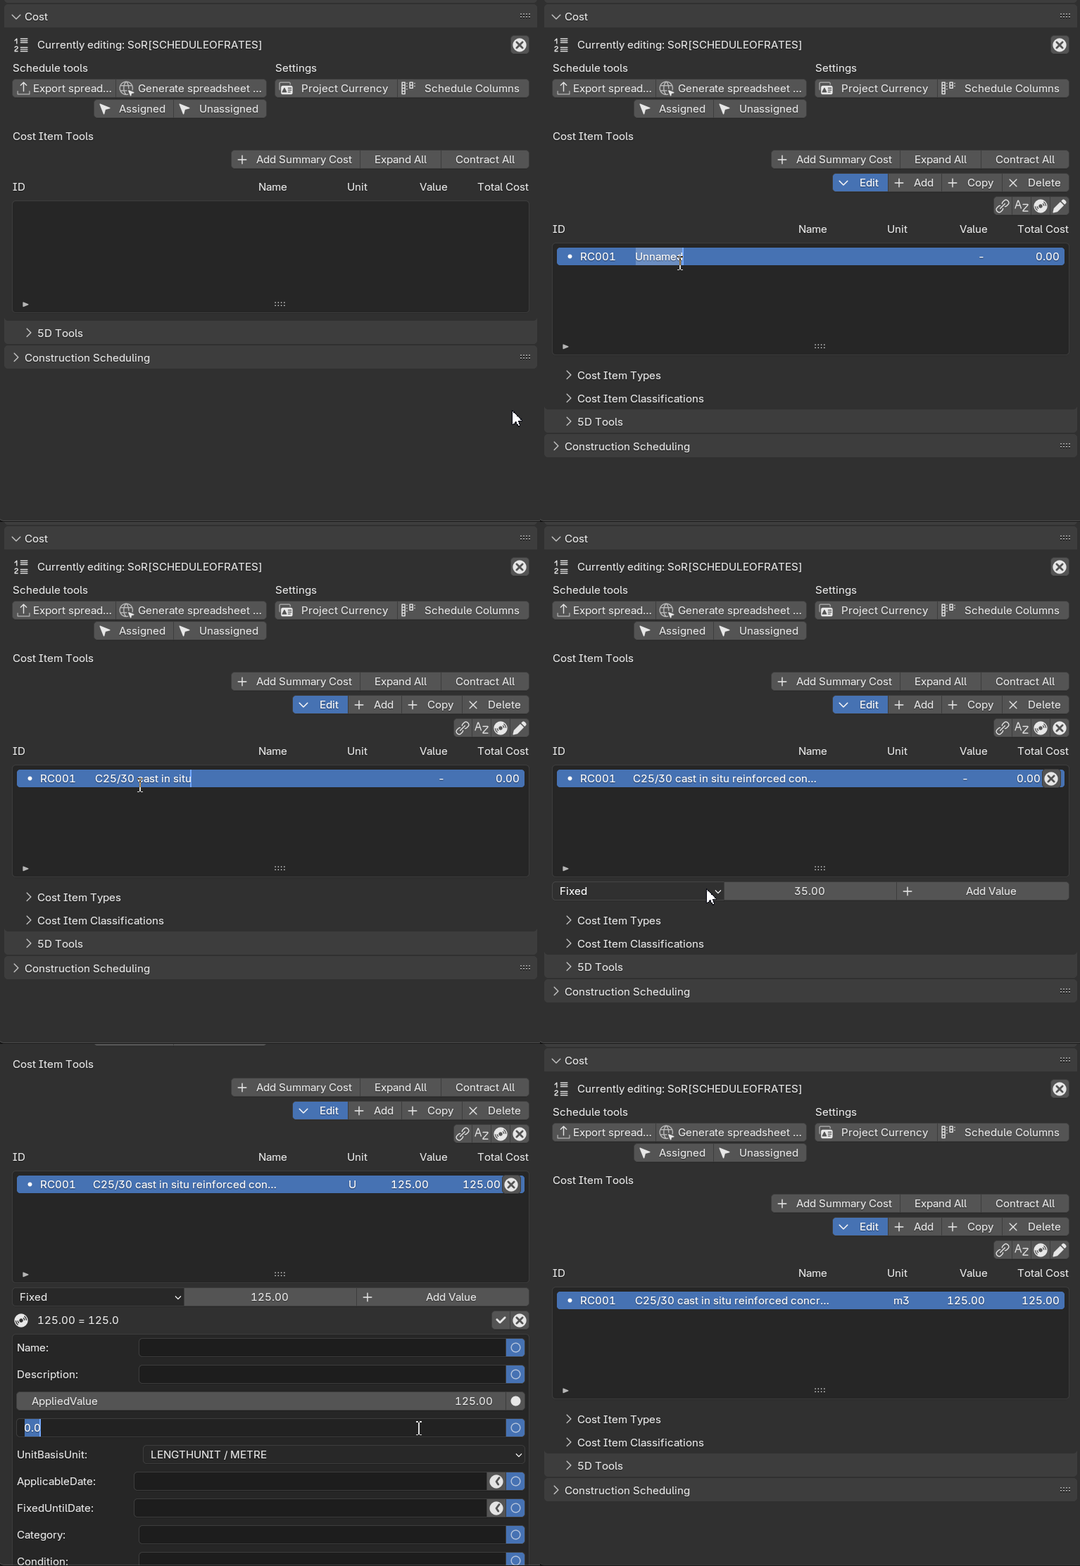
Editing of a Cost Item in the Schedule of Rates follows the same process used in other Cost Schedules.
Create Cost Items[edit]
Entity Definition of IfcCostItem
An IfcCostItem describes a cost or financial value together with descriptive information that describes its context in a form that enables it to be used within a cost schedule. An IfcCostItem can be used to represent the cost of goods and services, the execution of works by a process, lifecycle cost and more.
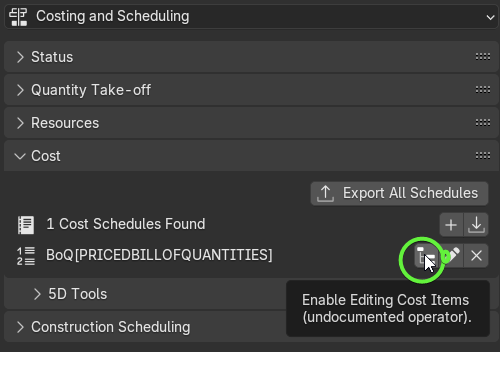
Click on the Folder Tree to Enable Editing Cost Items
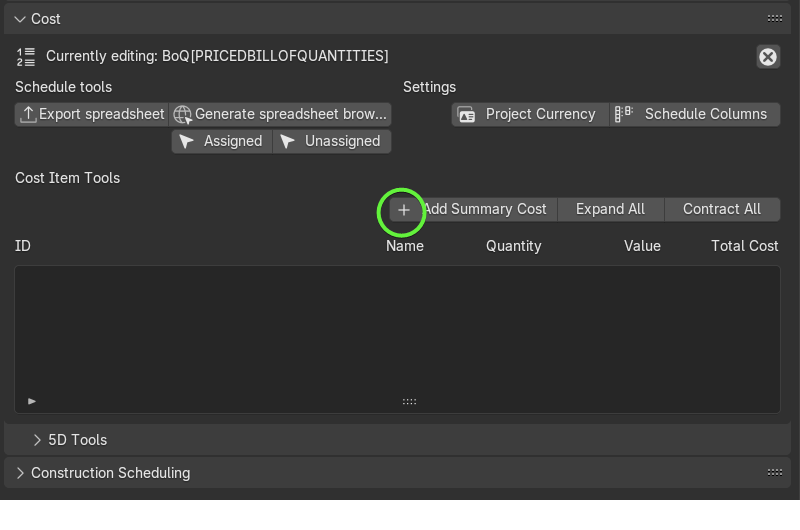
To add a Cost Item click on "+ Add Summary Cost"
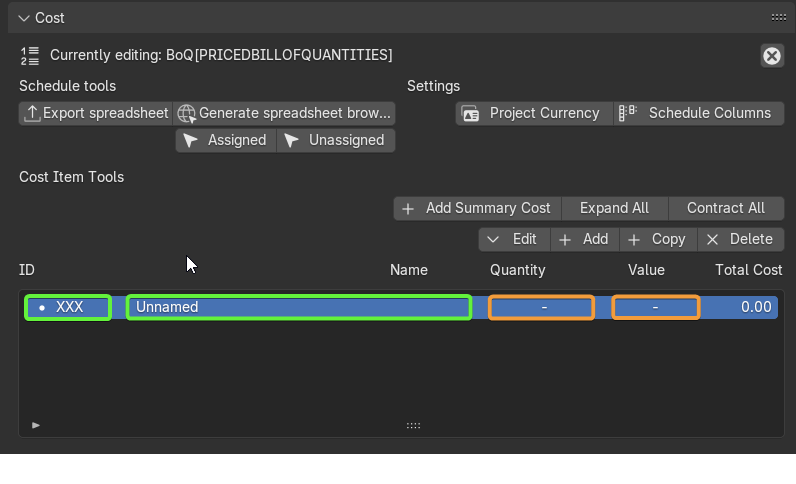
Refering to the figure below, and the attached template, a basic cost item structure would look like this:
Attributes are editable directly from the panel (in the green frame) by double-clicking on them
- ID : the Identification value of the Cost Item, typically according to a Cost Breakdown Structure (CBS) or similar
- Name : the name assigned to the Cost Item or a short description of its scope
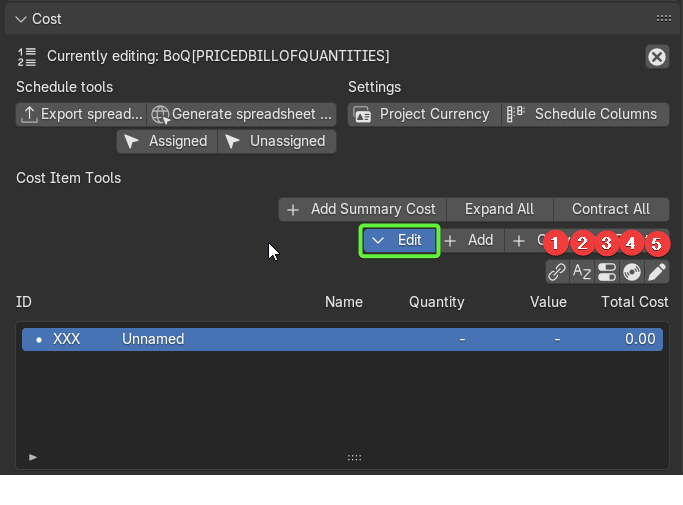
Other attributes can be edited by selecting the "Edit" icon and clicking on the "pencil" as indicated below
Items editable activating the Edit icon:
- Cost Item parenting hierarchy
- Sorting order
- Quantity
- Value
- Edit attributes
The parent items, or Summary Cost Items, should contain calculations of overall quantities and/or overall costs, whilst the related nested items would contain the specific quantites and costs of assigned Building Elements, Processes, or Resources.
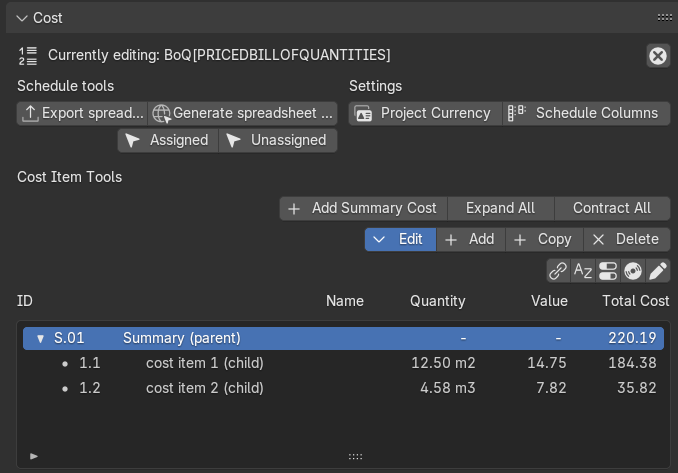
In the image below parent Item S.01 contains the `SUM` of the child items 1.1 and 1.2 below
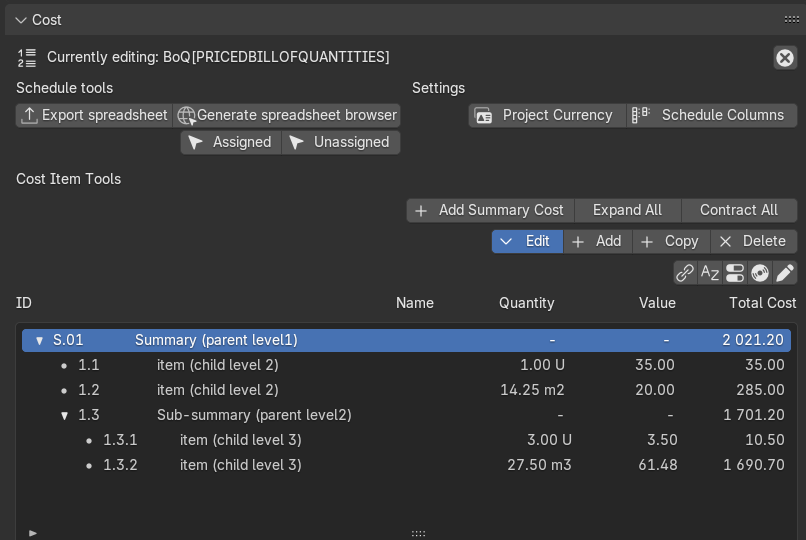
Cost items can be further nested like in the image below where the top item contains cost items 1.1 and 1.2, and a summary cost item 1.3 which itself contains cost items 1.3.1, and 1.3.2
Add Cost Item Values[edit]
- Manually
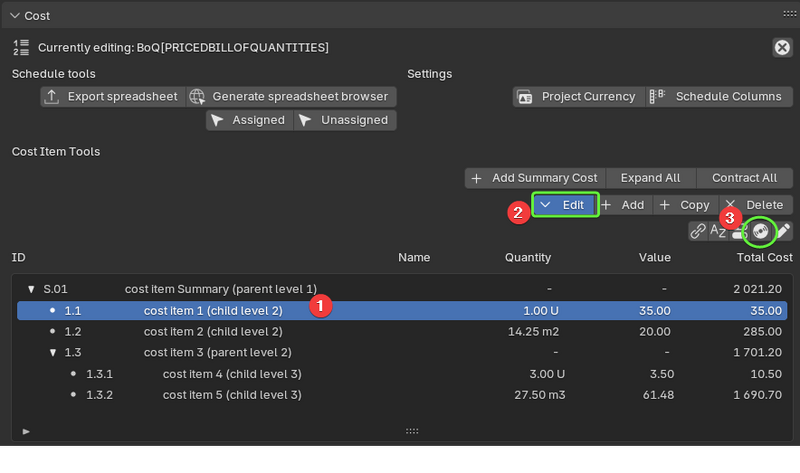
To manually add a value to a cost item, select the item, then "Edit", and click on the "disc" icon
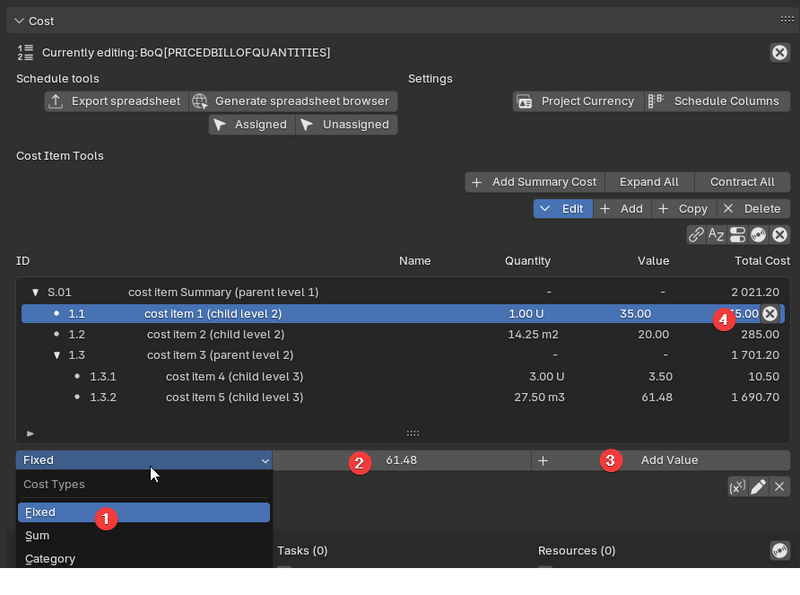
now some options become available at the bottom of the panel
in this example (1) select "Fixed" from the drop-down menu, (2) enter the desired value, (3) click on "Add Value", and (4) close the cost item edit
The cost item has a value that is multiplied times the "quantity" to calculate its "Total Cost"
If the cost item represents a "Summary", or a parent of nested child cost items, the procedure is as follows: (1) Select "Sum" from the drop-down menu, (2) click on "Add Value", (3) close the cost item edit:
- From a Schedule of Rates
- open the panel "Cost Item Rates"
- select the Schedule of rates from the drop-down menu
- select the rate
- click on the icon to link the rate to the one in the main Cost Schedule
Add Cost Item Quantities[edit]
There are different ways to add a Cost Item Quantity
- by manually enter it: (1) select the Cost Item, (2) "Edit", (3) click on the "switch" icon
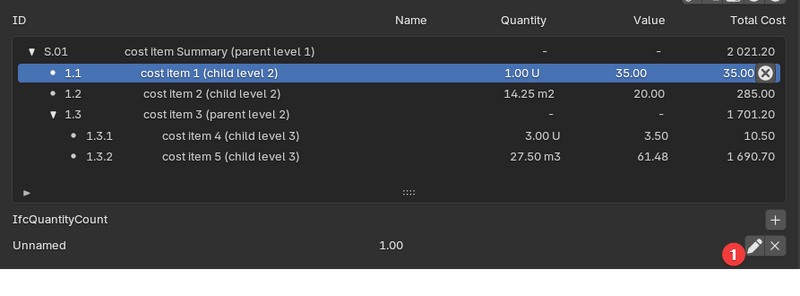
then click on the "pencil" to edit it
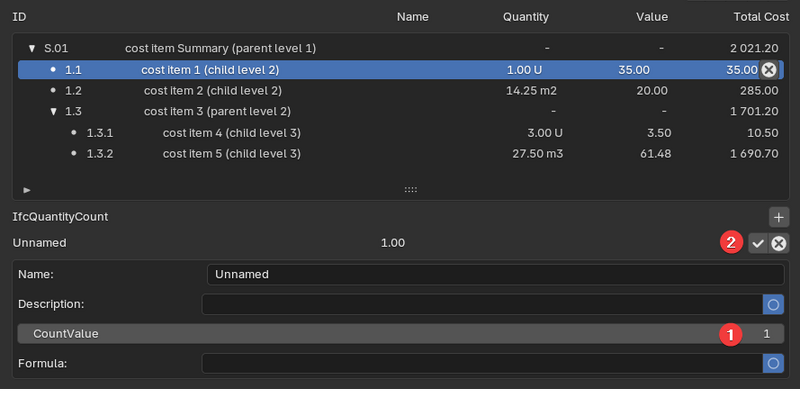
Once the panel below is available (1) enter the quantity in the box (in this case it shows CountValue, if a different unit is used, like volume or area, it may not look the same), (2) click on the tick icon to close it
Assign Building Elements to Cost Items[edit]
This session goes through the process of:
- perform take-off quantity of elements in the project
- check values in Quantity Sets automatically assigned to the elements
- assign quantity values to the cost items in a cost schedule
Derive Quantities from linked Building Element Quantities[edit]
Insert Content Here
Calculate Cost Item Totals[edit]
- Component Values and how to use them
- Calculating overall cost based on nested cost items
Useful Tools[edit]
Copying Unit Costs between cost items[edit]
Insert Content Here
Quantity Take off Tools[edit]
- Derive Heights, Areas, Volumes
- Manual quantities
- Automatic quantities
- Derive formwork areas
Creating Project Libraries[edit]
Deriving Cost items from Processes[edit]
Deriving Costs items from Resources[edit]
Creating Schedule of Rates based on Processes, Resources and Products[edit]
Sample Files[edit]
- .ifc template for costing
