Create your first Blender add-on

|
This page is part of a series about Starting to code. All articles in the series can be found in the Category:Start_coding |
The goal of this page is to help newcomers with a background in architecture or CAD software to rapidly prototype their ideas by making use of the blender API, especially the UI. It's not supposed to be very advanced, but rather to create a functioning environment for contained scripts and ideas without thinking about scalability. It is assumed however that you have a bit of experience in Python programming, or in any other programming language for that matter. If not, there are very good python crash courses available pretty much everywhere on the internet.
1. Adding a Panel in the interface
Blender comes pre-packaged with a host of python templates anyone can get ideas from. Within the Text editor go to Templates > Python > UI Panel Simple. A new text datablock should open with a few dozens lines of code. Click on the Play icon to run it. [1].
![[1]](https://community.osarch.org/uploads/editor/fj/96ltocafkj23.png)
Let's see what we just unleashed in the interface !
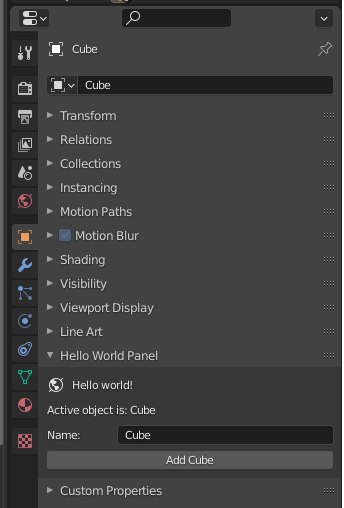
Create a new object and go into its properties. It's the orange square icon in the properties editor. There you'll see a new panel has been added to the interface. https://community.osarch.org/uploads/editor/rl/954bmn4hmsj0.png It contains 4 rows : One label with an icon : `row.label(text="Hello world!", icon='WORLD_DATA')` One label where the object name is displayed : `row.label(text="Active object is: " + obj.name)` One String field where you can actually change the active object's name. Depending on the object property, the field type is automatically changed to accomodate for the expected value. here the object name is a string object, so the field lets you input a string. `row.prop(obj, "name")` And finally a button (called operator in the Blender API), which creates a new Cube and selects it. `row.operator("mesh.primitive_cube_add")`
2. Moving the Panel to the 3D Viewport
I'd like to move this panel into the right hand side panel ("N" panel) of the 3D Viewport, the one you toggle with keyboard N or the tiny tiny arrow in the top right of the interface. https://community.osarch.org/uploads/editor/a2/odvs8087o1v6.png It's arguably not the best place to put your addon interface because it can get crowded when you enable a lot of addons, but it's alright for prototyping . You can see in the template we just imported that a panel is created by defining a new class that inherits from `bpy.types.Panel`. Then after the class is defined, there is a call to `bpy.utils.register_class(HelloWorldPanel)`. The API relies on a few instructions just after the class name definition in order to know where to place it and how to uniquely identifying in afterwards. They all begin with `bl_ ` to note they're particular class attributes. We have :
bl_label = "Hello World Panel"
The panel will display like this in the interface.
bl_idname = "OBJECT_PT_hello"
It will be uniquely stored by Blender using this. You can then access its properties from anywhere else in code with this identifier once it has been registered. Note that if you register multiple panels using the same idname, they will be overwritten each time and only the last one will display.
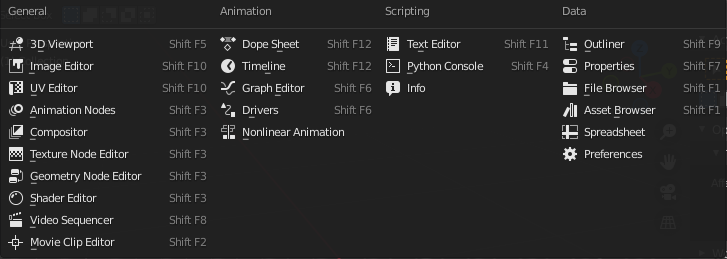
bl_space_type = 'PROPERTIES'
The panel will be placed in the Properties editor. Here are all the available editors in Version 3.0 : https://community.osarch.org/uploads/editor/8z/52ztjb27co7e.png You can note there is an editor type you probably don't have access to, it's called the Animation Nodes editor and it comes from a [great add-on](https://animation-nodes.com/). You can create custom editors with the Python API, but you're limited to a node-based editor similar to the shader editor.
bl_region_type = 'WINDOW'
This is a bit trickier. You just have to know that an editor is usually divided in several regions : Header on top, Footer on the bottom, Tools on the left, UI on the right and window in the middle. There are other specific ones and they're not always used for all editors but we won't go into the details here. Usually all the regions but the window region can be collapsed. https://community.osarch.org/uploads/editor/0t/y9t5ih1kpghh.png
bl_context = "object"
This places the new panel inside the object properties. You can place it in the scene properties, world properties, etc.
How do we place it inside the "N" panel of the 3D Viewport editor ? If you have already scripted a little bit in the Scripting workspace you must have seen blender's pseudoconsole in the bottom left corner. You'll notice that new lines appear when you click on buttons or change things in the interface. It's a great way to learn how things are called internally. Don't depend too much on it though, because not everything is printed out there, especially not all python errors, and some commands are obfuscated by design. Back to the previous point where I explained the Properties editor has several contexts that you can add your panel to. Try clicking on the scene icon for instance and this will be printed in the console : https://community.osarch.org/uploads/editor/qz/wyf5lqueuhin.png The rest of the explanation works best if you delete all objects in the scene. (Select > All and Object > Delete)
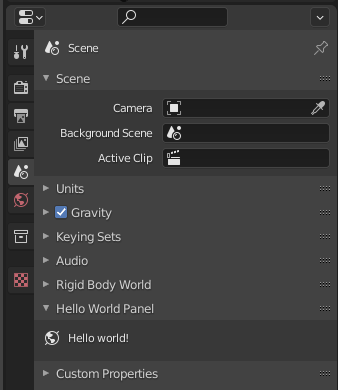
If you change `bl_context = object` in the panel definition to `bl_context = scene`, you'll notice that it now appears in the Scene panel. https://community.osarch.org/uploads/editor/8l/em48ojjwk3d5.png I honestly have no idea why we have to use lowercase words here when everywhere else in the code we have to use capital letters, but I'm sure there is a good reason. Also, now that we moved the panel and deleted all objects, only the first label appears, but not the others rows where we could spawn a new cube and change its name. We'll tackle that in a bit.
How do we know what is the `bl_space_type` of the 3D viewport ? Simple, change any editor to the 3D viewport editor and look at the console ! `VIEW_3D` https://community.osarch.org/uploads/editor/g6/dayd9wmlnbsb.png We want it to appear on the N panel, which by convention is called the `UI` region. But the UI region type doesn't have contexts, it has categories. You can name your category however you'd like to. So the few lines after the `class` definition and before the `draw` function should look like :
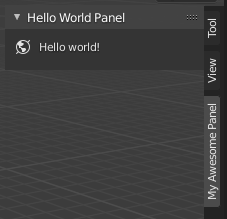
   bl_label = "Hello World Panel"
   bl_idname = "OBJECT_PT_hello"
   bl_space_type = 'VIEW_3D'
   bl_region_type = 'UI'
   bl_category = "My Awesome Panel"
Run the script again. The panel appears in the N panel ! https://community.osarch.org/uploads/editor/q8/s4c7r767hnt8.png You'll also notice the error in the console, which causes the few missing lines to not be displayed :
   Python: Traceback (most recent call last):
     File "\ui_panel_simple.py", line 21, in draw
   AttributeError: 'NoneType' object has no attribute 'name'
location: <unknown location>:-1
It's complaining that it can't find the name of the active object, but since we deleted all objects, we don't have an active object ! Add a new object, select it, and it all should be good. https://community.osarch.org/uploads/editor/65/vs7xfqqgfvg8.png
3. Customizing the interface
This panel can save you something like 2 or 3 clicks. Not really worth the time you put into making it happen is it ?! Let's make it a little bit smarter and interesting by expanding its functionality. Instead of creating a dumb cube, we want to create a cube, with custom dimensions ! And we want it to update in real time when we tweak its dimensions ! First let's add an integer property to the `Scene` type. This will add a custom property of type `IntProperty` to all scene objects in the file. Then, we can call this property in a field to change it in our panel. The `register` function now looks like this :
def register():
bpy.types.Scene.cube_x = bpy.props.IntProperty()
bpy.utils.register_class(HelloWorldPanel)
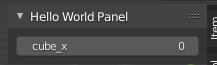
This property will be used to drive the cube's x dimension later on. We need to tweak the `draw` function to show it as a slider :
   def draw(self, context):
       layout = self.layout
       row = layout.row()
       row.prop(context.scene, "cube_x")
https://community.osarch.org/uploads/editor/eg/pbteiibggcax.png
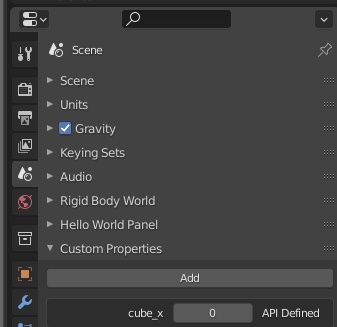
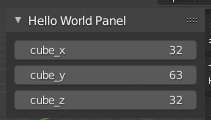
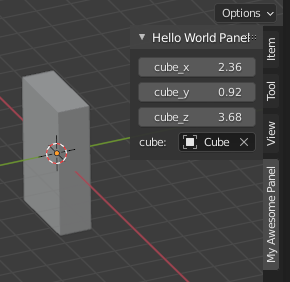
Now you can scrub all you want, and the scene property will be updated automatically. They're functionally the same property, just accessed by a different means than in the Properties editor's custom properties panel. https://community.osarch.org/uploads/editor/hr/49bihiw8q1c0.png Rinse and repeat to get the y and z to display too : https://community.osarch.org/uploads/editor/aj/1wsg22b2lpbk.png
   def draw(self, context):
       layout = self.layout
       # Mantra n°1 :  Time spent bug-hunting is directly proportional to the amount of copy-pasted lines
       for dim in ("x", "y", "z"):
           row = layout.row()
           row.prop(context.scene, f"cube_{dim}")
   def register():
       # Mantra n° 2 : Start dumb, make it work, then make it smart (and make sure it keeps working)
       for dim in ("x", "y", "z"):
           exec(f"bpy.types.Scene.cube_{dim} = bpy.props.IntProperty()")
       bpy.utils.register_class(HelloWorldPanel)
4. Selecting the target object
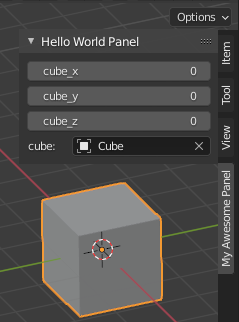
Using the API, all objects that inherit the [ID type](https://docs.blender.org/api/current/bpy.types.ID.html?highlight=id#bpy.types.ID) can be stored as a reference using a field with a [PointerProperty](https://docs.blender.org/api/current/bpy.props.html?highlight=pointerproperty#bpy.props.PointerProperty). We'd like to select an existing [Object](https://docs.blender.org/api/current/bpy.types.Object.html?highlight=object#bpy.types.Object) to dynamically resize it. Add this line to the `register` function :
bpy.types.Scene.cube = bpy.props.PointerProperty(type=bpy.types.Object)
And these lines to the `draw` function:
   row = layout.row()
   row.prop(context.scene, "cube")
Run the script, add a cube in the 3D viewport, then use the pipette to select it or click in the field and select its name. https://community.osarch.org/uploads/editor/ln/tvkprn2p9aka.png
5. Making Magic Happen™
We'd like for the cube to be dynamically resized when we scrub the property fields. Luckily the properties provide us with an [Update](https://docs.blender.org/api/current/bpy.props.html#bpy.props.IntProperty) method which fires a callback function whenever the user changes its value in the UI. We can see in the docs that we can also set a minimum and a default value. The update callback automatically provides the function with 2 parameters, the first one being the property that fired it, and the second one being the current context. The context is a data container which helps us retrieve information about what's going on in the blender interface, and a direct access to the objects that are being worked on, like the `context.scene`. First we define the update callback :
   def update_cube_dimensions(self, context):
       # Prevent an error if no cube is selected and return early :
       if context.scene.cube is None:
           return
       context.scene.cube.dimensions = (context.scene.cube_x, context.scene.cube_y, context.scene.cube_z)
Then we change the register function line where we define the IntProperties :
   for dim in ("x", "y", "z"):
       exec(f"bpy.types.Scene.cube_{dim} = bpy.props.IntProperty(min=1, default=2, update=update_cube_dimensions)")
Run the script, select the cube. Now scrub the dimension field to see the magic in action : https://community.osarch.org/uploads/editor/ko/4wafjmuiq4ps.gif
6. Making full use of the API
Nosing a bit around the documentation, we can see that instead of integer fields, we can use [float fields](https://docs.blender.org/api/current/bpy.props.html#bpy.props.FloatProperty), which let us define the dimensions with more granularity.
   for dim in ("x", "y", "z"):
       exec(f"bpy.types.Scene.cube_{dim} = bpy.props.FloatProperty(min=0.01, default=2, update=update_cube_dimensions)")
https://community.osarch.org/uploads/editor/ru/ps3aotpg1dgs.png
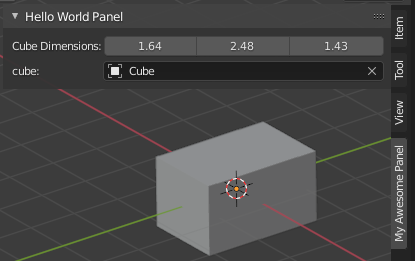
Even better, we can use [FloatVectorProperty](https://docs.blender.org/api/current/bpy.props.html#bpy.props.FloatVectorProperty) which let us create an array of float values. Register (Note we're using another parameter which lets us define a display name, by default the UI uses the variable name where we can't use spaces for instance) :
bpy.types.Scene.cube_dimensions = bpy.props.FloatVectorProperty(name="Cube Dimensions", min=0.01, default=(2, 2, 2), update=update_cube_dimensions)
Draw :
       row = layout.row()
       row.prop(context.scene, "cube_dimensions")
Update callback :
context.scene.cube.dimensions = context.scene.cube_dimensions
You may have to expand the panel horizontally to get the fields to display their numbers correctly. https://community.osarch.org/uploads/editor/u6/x9owaoe607ry.png
7. From script to add-on
Using a script is pretty simple, but the major drawback is you have to go into a text editor and copy/paste it or load from a file to make it run, and all changes are lost when you quit Blender and re-load it. It's fine when you're testing things out and making a lot of adjustements, but if you're not making any changes, having to load&run it every time you launch Blender can be a hassle. Making it into an add-on persistently adds the functionality to Blender and you don't have to worry again about running it. There are a number of bits of information that are needed by Blender to know how to turn a simple script into an add-on. Hopefully it's [pretty straightforward](https://docs.blender.org/manual/en/latest/advanced/scripting/addon_tutorial.html#write-the-add-on-simple). Add these lines in the first lines of the script :
   bl_info = {
       "name": "My Awesome add-on",
       "blender": (2, 80, 0),
       "category": "Object",
   }
We also have to worry about one thing which didn't bother us until now : Unregistering all the features we enabled with the add-on once we want to disable it. It can be nice to disable specific addons because they all add, even if it's only in the slightest, to the computations that Blender has to do each frame. They also often add properties to some objects like we did with the Scene object and it can be bothersome, or even add to the file size. Fortunately the panel template provided us with a `unregister` function which already took care of unregistering the panel. We just have to add instructions to remove the link to the scene custom properties we added :
   def unregister():
       del bpy.types.Scene.cube
       del bpy.types.Scene.cube_dimensions
       bpy.utils.unregister_class(HelloWorldPanel)
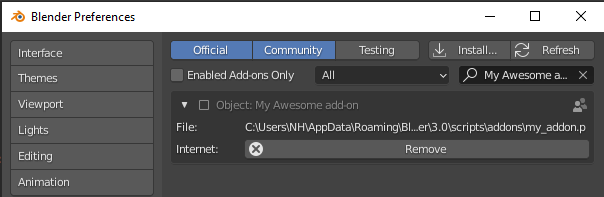
With your script selected in the Text editor, go to Text > Save As and save it somewhere on your PC. Be sure to add a `.py` extension, that will help Blender recognize it as a python file when registering the add-on. Then, make sure to quit & restart Blender to wipe out the interface changes you made with your script, and go to Edit > Preferences > Add-on > Install and pick the file you just created. The interface should update and hide all other add-ons, and present you with a single, inactive addon. https://community.osarch.org/uploads/editor/l1/t8e5npkzmrqo.png Click on the checkbox in the top left to activate it. That's it ! Your add-on is registered. Now when you quit & restart Blender, the panel will still be there. And when you disable the add-on, the panel will disappear and the scene objects won't automatically spawn with your 2 custom properties. Click on Remove to permanently delete the add-on from Blender. Note that it won't delete the python file you originally saved, but it will delete the file it created (a copy of the first one) in the AppData/Roaming/Blender Foundation/Blender/*your version*/scripts/addons/my_addon.py (on Windows at least). The actual path is labeled just below the add-on header in the preferences.
This is the final form of the add-on :
   import bpy


   bl_info = {
       "name": "My Awesome add-on",
       "blender": (2, 80, 0),
       "category": "Object",
   }


   def update_cube_dimensions(self, context):
       if context.scene.cube is None:
           return
       context.scene.cube.dimensions = context.scene.cube_dimensions


   class HelloWorldPanel(bpy.types.Panel):
       """Creates a Panel in the 3D Viewport N Panel"""
       bl_label = "Hello World Panel"
       bl_idname = "OBJECT_PT_hello"
       bl_space_type = 'VIEW_3D'
       bl_region_type = 'UI'
       bl_category = "My Awesome Panel"

       def draw(self, context):
           layout = self.layout
           row = layout.row()
           row.prop(context.scene, "cube_dimensions")
           row = layout.row()
           row.prop(context.scene, "cube")


   def register():
       bpy.types.Scene.cube_dimensions = bpy.props.FloatVectorProperty(name="Cube Dimensions", min=0.01, default=(2, 2, 2), update=update_cube_dimensions)
       bpy.types.Scene.cube = bpy.props.PointerProperty(type=bpy.types.Object)
       bpy.utils.register_class(HelloWorldPanel)


   def unregister():
       del bpy.types.Scene.cube
       del bpy.types.Scene.cube_dimensions
       bpy.utils.unregister_class(HelloWorldPanel)


   if __name__ == "__main__":
       register()
8. Addendum
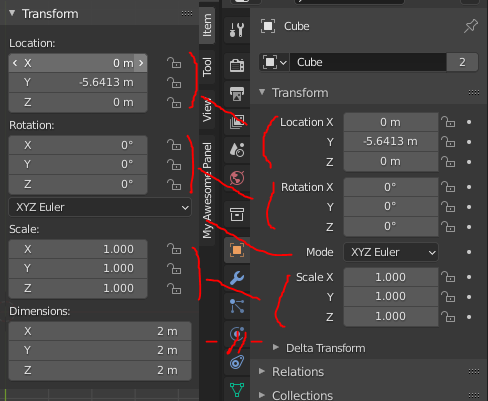
One important thing to understand in Blender interface is that UI elements are only "for show" shortcuts to the actual data. The actual data is not directly tied to how it's displayed in the interface. A piece of information can be accessed from different areas in the interface. For instance, the object transforms can be accessed via the N panel "Item" subpanel, AND via the object properties' "Transform" panel : https://community.osarch.org/uploads/editor/lr/c5g9bc50dyv6.png They display the same data, but they are *presented* differently. Note that the final part of each panel is different : In the 3D viewport, we have access to the object dimensions, whereas in the properties editor, we have access to the Delta transforms. I'm bringin that up because, if the only functionality of our add-on is to manipulate the object's dimensions, why wouldn't we just display these fields ? We can cherry-pick these properties and display it as we wish. We don't even need fancy callback functions because we will be directly manipulating the data.
   class HelloWorldPanel(bpy.types.Panel):
       """Creates a Panel in the Object properties window"""
       bl_label = "Hello World Panel"
       bl_idname = "OBJECT_PT_hello"
       bl_space_type = 'VIEW_3D'
       bl_region_type = 'UI'
       bl_category = "My Awesome Panel"

       def draw(self, context):
           layout = self.layout
           if context.scene.cube is not None:
               row = layout.row()
               row.prop(context.scene.cube, "dimensions")
           row = layout.row()
           row.prop(context.scene, "cube")


   def register():
       bpy.types.Scene.cube = bpy.props.PointerProperty(type=bpy.types.Object)
       bpy.utils.register_class(HelloWorldPanel)
https://community.osarch.org/uploads/editor/ev/n6jcn7cs88pv.gif
9. Troubleshooting
Don't forget to re-run your script when you made changes to see them in effect. That's the "Play" icon. If you want Blender to forget all the changes you made in your script, simply quit and restart.
10. Epilogue
That being said, if you wanted to specify custom functionality, or custom constraints, like the Z dimension must not be > 2.5 units or Y must be at least 2 * X, you can do it pretty easily with the way we designed our add-on. It's just an illustration to serve the point. If you're interested but feel lost, that's normal. There's a world of possibilities out there. I suggest looking around [Blender Stack Exchange](https://blender.stackexchange.com/questions/tagged/python?sort=MostVotes) python questions, like this one https://blender.stackexchange.com/a/57332/86891 (might be outdated on some aspects, but it's a great resource).